Showing posts with label Security. Show all posts

Thursday, July 6, 2023

Setting Up Bitvision NVR And App

Before we can add a device to the phone we need to make sure the NVR is online (on the Net). 

From The NVR

Using the mouse Login to the NVR:  The default user is : admin and password is 12345

Then make your way to


Or From Microsoft Edge Browser

This can be daunting as web browsers have too much security and it may take some time to get it to work but follow along if you can.

Use Microsoft Edge as Chrome is not a well supported I found

Type the IP address into the NVR : if you’re not sure on how to find your IP address of the NVR you can either find it in the Network settings of the NVR or you can use the Bitvision search tool.

https://www.dropbox.com/s/tpuc1ebleopwbvk/SearchTool%20for%20WIN_V1.5.1.230221_R1.exe?dl=0

After installing the Search tool run it. As you can see my IP address is 192.168.0.244


Once you know your IP address type it into the browser (don’t use this IP address use yours) mine is http://192.168.0.244/login.html  

Type in your username and password and if you haven’t changed yours yet (Please do) default is admin and password is 12345

Once logged in it should look something like this unless you have different firmware.

Make your way to Configuration then Network then P2P, P2P must be ticked (enabled) and your status must say Online, if it does your good to go no port forwarding necessary (you only need to port forward if you have changed the HTTP port to something else besides the default (80) in Network settings.

The below screen shot may be slightly different to yours, you may have the QR codes one for Android, IOS and serial Number or combined like this one. 


Default ports listed below – Your IP address and gateway will match your configuration

Your gateway is of course you Modem IP address – In my case my modem is on a 0 Dot network so the NVR is on the same 0 Dot network.


Time to install the app

Scan the Android/IOS QR code in the Configuration /System/Network/P2P screen or using you mobile search for Bitvision in the app store.

Must register an email address to the app.


From the left hand panel select “Device manage” then click (add +) then SN Add(recommended)


From the NVR go to network then P2p and scan the Serial QR code or from web browser go to Configuration /System/Network/P2P screen and scan Serial QR code


Other posts : 

Bitvision Playback, "this function is not supported, please use the controls to play" : https://youtu.be/XON_HROTXYo

Helpful notes

iVMS320 software is PC client for Bitvision device with S/N starting with "8"

VMS lite is for freeip device with S/N starting with "9".


Saturday, February 18, 2023

Microsoft Edge Browser Support For Dahua, Hikvision And More

Using Microsoft Edge in Internet Explorer Mode is the best option as Chrome is not always compatible.

First open Microsoft Edge then type the IP address of the camera in my case 192.168.0.204.

It came back with this error message:  http://192.168.0.204/notSupported.asp


You will need to enable Internet explorer mode in Microsoft Edge

Click on the "three dots" in the top right then scroll down till you find "Reload in Internet Explorer mode".


If you get the below dialog box, enable "Open this page in Compatibility view" and "Open this page in Internet Explorer Mode", then click "Manage" Do not click done, Yet.


Here is where you add all the cameras IP addresses click "Add"


As you can see, I have added quite a few cameras. you must include the Http://


If you need to get back to this page to add more cameras you only need to go the "three dots" in the top right, then go to "Settings" then "Default Browser."


Now log into your camera in my case it was http://192.168.0.204 and make sure you don't add the 
/notSupported.asp only http://192.168.0.204
Also, don't be tempted to click on the "Open in Microsoft Edge" otherwise you will undo all the work you've done, this message will only come up when you are viewing your cameras anyway.


Monday, November 14, 2022

Bitvision Playback - This Function Is Not Supported, Please Use The Control To Play

If you get this message when you try to playback footage from your NVR, "Watch Video Below"

"This Function Is Not Supported, Please Use The Control To Play"


https://youtu.be/XON_HROTXYo

If you dont have LsNXVRPlugin  direct  at location C:\Program Files (x86)\LsNXVRPlugin

or C:\Program Files\LsNXVRPlugin then cick Download plugin then run the Plugin

LsNXVRPlugin_V21.2.12.210616_R30.exe


.


Saturday, October 5, 2019

SQ11 Mini Camera Help Guide


First thing is to place a micro SD card into the camera this must go the right around, if you place the SD card the wrong way the SD card will fall in and you will need a small screwdriver to remove it - be careful as you could snap the SD card or damage the internal electronics.


The best way is to insert the SD card then use the supplied lead to get the footage off the camera, that way you don't damage the SD card by removing and inserting all the time.

Supports up to 64 Gig - preferable class 10 or Higher micro SD card 


There are different models of this camera so the Button presses will be slightly different on each
1) Press the Power button for 2 seconds  the camera is now powered on

2) Blue light is on, this standby mode 720p Recording mode - Press the Power button for one second  to START recording in 720p and then again to stop recording.
3) Press the Mode button  for one second, the camera  body will illuminate red with steady blue light telling you your are in 1080p mode - Press the Power button for one second again to START recording in 1080p and then again to stop recording.

4) Press the Mode button again, the camera body will illuminate red and the light is solid red, you are in photo mode - Press the Power button for one second to take a photo and then keep pressing the power button to take a photo.

5) Infrared Mode - Place the camera into 1080p mode, Press the Power button for 2 seconds the camera body flashes red 2 times and blue light flashed 3 times the camera is in Infrared mode - Press the Power button for one second again to START recording in 1080p night mode, then again to stop recording.

6) Motion sensing Mode - In either 720 or 1080p mode, Press the Mode button for 3 seconds. the body of the camera will flash red 3 times. Press the Power button for one second to START recording,  then again to stop recording. When motion is detected the video recording with start automatically and the camera body will lash red.

7) Webcam/video out mode - Camera must be in off, connect USB to your PC, run the camera app on your PC


After you have stopped recording and haven't pressed a button for around 50 seconds the camera will automatically turn off or you can hold down the power button for 5 seconds to switch the unit off.

Monday, June 24, 2019

Enable Infrared On HikVision Camera

Login into your HikVision camera, Click on Maintenance, then select the System Service tab.

Enable IR Light, then click Save


Sunday, May 19, 2019

Low Battery Ness M1 Gold

The M1-kp2 lcd keypad displays Low Battery.


If it maintains a voltage above 12.2V during the test then the battery is OK, if not the Low Battery will display on the LCD keypad.

In my tests the battery measured fine with a Multimeter but this doesn't load the battery.

After the Battery test i was none the wiser, I replaced the Panel 12V 7.2 ah battery anyway and repeated the test but the display still showed Low Battery.

After a full 24 hr charge the Low Battery indicator disappeared

To Manually do a battery load test 

1) Press the ELK key then enter your Master User Code
2) Press the UP arrow key to 8-System Settings
3) Press the RIGHT arrow key then Enter the Master User Code
4) Press 4 takes you to 84-System Test
5) Press the RIGHT arrow key to enter 1:Battery Test
6) Press the Right arrow key again to start the Battery Test

Saturday, November 10, 2018

Avtech VideoViewer Wont Save Footage

Using the web browser I was unable to save the footage from my Avtech camera with built in SD card, I found the files were hidden, seems as though they I didn't have permission even if i saved it in the default user folder the files were hidden and show hidden files options was enabled.


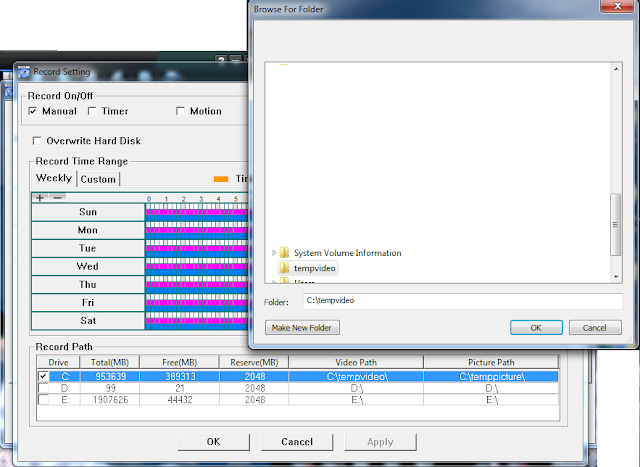
Fix: Used the latest version of Video Viewer 0.2.1.6, all Footage saved fine to the default directory : C:\tempvideo

If you want to change the default directory which may have been my original problem of not having permission to save the file, click on the three dots then select new location


To convert this AVC file to AVI download this working VideoPlayer : https://lozaelec.blogspot.com/2018/11/avtech-videopayer-does-not-run.html


Run the player, Select the AVC file then click AVI


To convert to any other format besides avi I use MyFFVideoConverter which works a treat or DivX Converter 10

https://sourceforge.net/projects/myffvideoconver/

http://www.divx.com/en/software/converter/features: It takes a while to analyse the file and it may download a codec update but it will convert Avtech AVC files

Friday, November 9, 2018

Avtech VideoPayer Does Not Run

If you get one of these two error messages after installing and running VideoPlayer.exe


Fix : Below version works fine

https://drive.google.com/file/d/1xcIw71Vwc646wvhJjDW_o_ofqMMds7sq/view?usp=sharing


Saturday, October 13, 2018

Find Your Camera On The Network Avtech,Hikvision,Longse

To find a camera on your Network you can use a free network scan tool : http://www.nirsoft.net/utils/wake_on_lan.html

32 bit Direct link :  http://www.nirsoft.net/utils/wakemeonlan.zip

If your scanning from your mobile you can use iNet Network Scanner : https://itunes.apple.com/au/app/inet-network-scanner/id340793353?mt=8

Make sure your on the WiFi network before scanning

You first need to know your networks gateway, To find your Gateway, Go to Start then type cmd


Right click on cmd.exe and type ipconfig then press enter


As you can see in my case the Pc's IP address is 192.168.0.129 and the Gateway (modem) is 192.168.0.1

Now run wakemeonlan

Got to the top menu's and choose options then click on advanced options


Tick "Use the following network adapter"

This should automatically populate your network adapter

Tick "Scan the following ip address range"

In the above cmd example the gateway and PC were on a "0." network which means I need to fill in the from as 192.168.0.1 and the To as 192.168.0.255 (see below)


If your cmd is on a "1." network as per below example 

Then you would need "Wake me on lan" to look like below fill in the from as 192.168.1.1 and the To 192.168.1.255 (see below)


Press OK, press the green play to start scanning


In the above scan you can see it has picked up the Avtech camera and its IP address is 192.168.0.200

You can now type this into your browser eg. http://192.168.0.200  then press enter 

Don't forget 192.168.0.200 is my camera IP address you must enter yours


Look at the your instructions for your cameras default username and password

In most cases in will be user admin and password admin or admin and no password just enter.

You must match case for Verification Code for Avtech cameras to login

Hikvision Ip Lan search  tool : https://www.hikvision.com/en/Support/Downloads/Tools


Longse IP Lan Search tool : http://www.longse.com/SUPPORT/Download/Tools/


To change the IP address to your network select the camera you want to change, edit the IP address to your IP address. You must enter the username and password before you click modify.
By default the username and password is usually admin for both.