This all started when my new iPhone X for some reason ran out of iCloud storage space, but I knew that I was only backing up a few things that this could not be correct.
I rang Apple to get them to sort it and by the end of the it they just asked me to do a backup to the PC to determine if the backup size was the same as the iPhone and it was.
The problem is that the gobbledygook data found in C:\Users\username\AppData\Roaming\Apple Computer\MobileSync\Backup was unreadable and I could not determine what was taking up the data considering I wasn't backup much at all and the total amount of the apps were not adding up to the 5.6 gig of data storage it was telling me it needed.
Support rang back and I asked them to go through my iPhone logs /back up and determine what was going on. (awaiting a response, they never rang back or answer any of the support emails)
I've had an iPhone ever since the iPhone 3gs and have always backed up to the cloud.
Many sites tell you to reclaim your storage space by speaking to a senior adviser and asking them to release the storage, i try to ask support to do this but it did not solve the problem.
https://discussions.apple.com/thread/7908345
https://discussions.apple.com/thread/8275694
https://apple.stackexchange.com/questions/216317/icloud-storage-doesnt-add-up
I am so so close to moving to android and taking back control of my files and how they are managed.
Its not asking much for to get apple to backup your settings and app data that's all i need, in fact that all i have switched on.
I have added up all the app data in iCloud /Manage Storage, the excel spreadsheet i made lists all the apps and data they take up which was a total of 900 Meg max, no mail, no photos/videos and no music.
I feel this is all a scam to get you to buy more storage and I've got a spreadsheet to prove it, it does not add up to 5.6 gig
The manage storage section should give you an accurate amount of space taken up by the app and as its says manage storage, give the customer the ability to delete the apps or the data in the app that is taking up space.
You could say why don't you just back it up to the PC and yes I do that anyway but the icloud backup should reflect storage accurately.
My thoughts are that if you have turned on your photos/video's or mail at one stage then turned it off, it seems to reserve this space based on previous usage and you don't get it back.

Showing posts with label Phone/Modem Support. Show all posts
Showing posts with label Phone/Modem Support. Show all posts
Tuesday, May 14, 2019
Saturday, February 16, 2019
Blocking IP Address In Telstra Gateway Modem
Login into your modem probably something like 192.168.0.1 or 192.168.1.1
In Basic View Click Parental Controls

In Advanced View Click Parental Controls

Firstly enable Parental Controls

Click "Add New Site" some boxes will appear, type in the IP address you want to block then type ALL to block this site on all PC's or you can block a certain local IP address by typing in the local IP address or computer name.(To Add click the small + button on the right)


Monday, September 17, 2018
How To Reboot Telstra Smart Modem From Browser
Log into your modem, in my case it was 192.168.0.1
From Browser type http://192.168.0.1/ enter the username and password

Click on the advanced icon

Click on Gateway

Then Restart

From Browser type http://192.168.0.1/ enter the username and password

Click on the advanced icon

Click on Gateway

Then Restart

Friday, April 1, 2016
WiFi Channel Scanner iPhone/iPad
Download the Airport Utility app
 Once downloaded go to setting then scroll down to the Airport Utility app and enable Wi-Fi Scanner


Return back to the app, you will now see a Blue colored Wi-Fi Scan in the top right of the app.
Click Wi-Fi Scan

This will display all the neighboring WiFi routers in the area.
You will can now change your personal router to an unused channel this will help eliminate problems with WiFi connections/dropouts.

Also see : Choosing the best Wi-Fi channel : https://lozaelec.blogspot.com/2016/12/choosing-best-wi-fi-channel.html
Friday, March 25, 2016
Port Forward Remote Desktop On Billion 7800VDPX
First you will need to login into your modem in my case 192.168.2.254
Make your way to Configuration/Security/IP Filtering/incoming
 In my case I have 3 computers I want to access.
Each computer has a Static IP
Computer 1 is 192.168.2.88
Computer 1 is 192.168.2.77
Computer 1 is 192.168.2.66
RDP-K is the setup with the default Remote Desktop port of 3389, as you can see in the above picture port 3389 this will go to IP address 192.168.2.88.
Now you will need to configure the Virtual Server, see below for configuration

From a remote PC obviously run Remote Desktop Connection
To get to Computer ,1 its as simple as entering your WAN IP
If you don't know your wan IP the go to : http://www.whatsmyip.org/
For help see: http://lozaelec.blogspot.com.au/2011/07/what-is-my-wan-ip-address.html
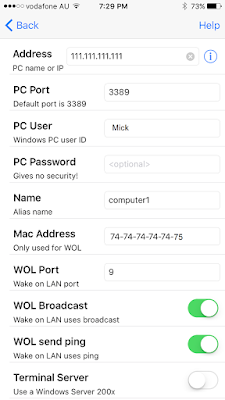
To get to Computer 1, enter your wan Ip : EG 111.111.111.111

To get to Computer 2, enter your wan:3390 : EG 111.111.111.111:3390

To get to Computer 3, enter your wan:3391 : EG 111.111.111.111:3391

Using say iPhone RDP configure screen
Computer 1

Make your way to Configuration/Security/IP Filtering/incoming

Each computer has a Static IP
Computer 1 is 192.168.2.88
Computer 1 is 192.168.2.77
Computer 1 is 192.168.2.66
RDP-K is the setup with the default Remote Desktop port of 3389, as you can see in the above picture port 3389 this will go to IP address 192.168.2.88.
Now you will need to configure the Virtual Server, see below for configuration

From a remote PC obviously run Remote Desktop Connection
To get to Computer ,1 its as simple as entering your WAN IP
If you don't know your wan IP the go to : http://www.whatsmyip.org/
For help see: http://lozaelec.blogspot.com.au/2011/07/what-is-my-wan-ip-address.html
To get to Computer 1, enter your wan Ip : EG 111.111.111.111

To get to Computer 2, enter your wan:3390 : EG 111.111.111.111:3390

To get to Computer 3, enter your wan:3391 : EG 111.111.111.111:3391

Using say iPhone RDP configure screen
Computer 1

Sunday, February 28, 2016
7800VDPX Assign A Static IP /Static Host
To Add a static in My old Billion modem it used to be in Advanced/Lan/DHCP server/Fixed Hosts, and now under Configuration/Lan/Ethernet.

Click add then enter you parameters, then click Apply.

If you try to add an IP address that is within the DHCP range it will give you this error.


Click add then enter you parameters, then click Apply.

If you try to add an IP address that is within the DHCP range it will give you this error.

You need top pick an IP address that is is not between 20 and 254 - in my case that leaves me between 1 and 19.

Sunday, February 7, 2016
TP-Link Archer C7 V2 Firmware Updated To Custom Firmware DD-WRT
WARNING FIRMWARE UPGRADES ARE DONE AT YOUR OWN RISK
YOU COULD END UP WITH A BRICKED UNIT
AND ALWAYS BACKUP YOUR FIRMWARE
This is what worked for me, I tried Gargoyle, then OpenWRT and ended up using DD-WRT
Just to be clear I have no expertise in Linux, but I will show you what worked for me and how went about it.
I wanted to update the firmware on a TP-link router so I could monitor the bandwidth of my wireless network.
****************************************************************************
Note that most firmware's seem to default to 192.168.1.1 and sometime 192.168.0.1
You will need to change your PC's Default Ip address to login into the router if your Pc has a Static IP and not DHCP.
Gargoyle version that worked for me : gargoyle_1.8.1-ar71xx-generic-archer-c7-v2-squashfs-factory.bin
Download : http://www.gargoyle-router.com/download.php
scroll down to archer-c7-v2

****************************************************************************
OpenWrt version that worked for me : openwrt-15.05-ar71xx-generic-archer-c7-v2-squashfs-factory.bin
Download : https://downloads.openwrt.org/chaos_calmer/15.05/ar71xx/generic/openwrt-15.05-ar71xx-generic-archer-c7-v2-squashfs-factory.bin
****************************************************************************
DD-WRT versions that worked for me
Download :
ftp://ftp.dd-wrt.com/betas/2016/01-19-2016-r28882/tplink_archer-c7-v2/factory-to-ddwrt.bin
Download : http://www.gargoyle-router.com/download.php
scroll down to archer-c7-v2

****************************************************************************
Download : https://downloads.openwrt.org/chaos_calmer/15.05/ar71xx/generic/openwrt-15.05-ar71xx-generic-archer-c7-v2-squashfs-factory.bin
****************************************************************************
DD-WRT versions that worked for me
Download :
ftp://ftp.dd-wrt.com/betas/2016/01-19-2016-r28882/tplink_archer-c7-v2/factory-to-ddwrt.bin
ftp://ftp.dd-wrt.com/betas/2016/01-25-2016-r28942/tplink_archer-c7-v2/factory-to-ddwrt.bin
DD-WRT supported Devices : https://secure.dd-wrt.com/wiki/index.php/Supported_Devices#Supported_Devices
Firmware's not available in the Router-Database : ftp://ftp.dd-wrt.com/betas/
Open the Year/Build (in my case 2016 then 01-25-2016-r28942), then scroll down to tplink_archer-c7-v2


Firmware's not available in the Router-Database : ftp://ftp.dd-wrt.com/betas/
Open the Year/Build (in my case 2016 then 01-25-2016-r28942), then scroll down to tplink_archer-c7-v2


Once the Firmware is uploaded you will need to Login with the default IP address of 192.168.1.1 but you will not be able to do this unless your computer is on the same network.
In my case I had to change my Static IP address to the same as the router.
To do this Go to Control Panel, then Network and Sharing center, then change adapter settings.
Right click on Network area connection, then properties, then scroll down and double click to Internet Protocol Version 4 (TCP/IPv4)
Change the Ip address to say 192.168.1.7
Subnet Mask as 255.255.255.0
Gateway and DNS as 192.168.1.1 (Routers default IP adress)
As you can see I had to change it from 192.168.2.77 network to 192.168.1.7 network so I could access the routers default IP address of 192.168.1.1


Now login to the router by typing 192.168.1.1 into your web browser.
Now I needed to change the default IP address from 192.168.1.1 back to my networks address 192.168.2.201 on my network. (Change back to your local network address if needed)

You can now go through and change any other settings, including your wireless security settings.
Sunday, January 31, 2016
TP-Link Archer C7 V2 From OpenWrt Back To DD-WRT
WARNING FIRMWARE UPGRADES ARE DONE AT YOUR OWN RISK
YOU COULD END UP WITH A BRICKED UNIT
AND ALWAYS BACKUP YOUR FIRMWARE
This is how I reverted the firmware back from OpenWRT back to DDwrt
You need to change your network adapter to 192.168.1.66 ( see picture below)

Download Tftp32 : http://tftpd32.jounin.net/tftpd32_download.html
Download : factory-to-ddwrt.bin
Make sure its named : factory-to-ddwrt.bin do not rename
Place factory-to-ddwrt.bin into the same spot you run tftpd32.exe (just makes life easier)
In my case C:\Users\Loza\Downloads\tftpd32.452 (it will default to the location of where tftpd32.exe resides)
Make sure you select the correct network adapter 192.168.1.66 (Must be 192.168.1.66)

Select TFTP server tab
I am assuming you have the router connected to the network, and turned off.
Hold the WPS/Reset button while powering up the router and continue to hold it down for around 10 seconds.
If everything went worked OK you will see it force the firmware back into the router.


Worked for me hope it worked for you
TP-Link Archer C7 V2 From DD-WRT Back To OpenWrt
WARNING FIRMWARE UPGRADES ARE DONE AT YOUR OWN RISK
YOU COULD END UP WITH A BRICKED UNIT
AND ALWAYS BACKUP YOUR FIRMWARE
This is how I I reverted the firmware back from DDwrt back to OpenWRT
You need to change your network adapter to 192.168.1.66 ( see picture below)
Download Tftp32 : http://tftpd32.jounin.net/tftpd32_download.html
Download : openwrt-15.05-ar71xx-generic-archer-c7-v2-squashfs-factory.bin
Rename : openwrt-15.05-ar71xx-generic-archer-c7-v2-squashfs-factory.bin to ArcherC7v2_tp_recovery.bin
Place ArcherC7v2_tp_recovery.bin into the same spot you run tftpd32.exe
In my case C:\Users\Loza\Downloads\tftpd32.452
Make sure you select the correct network adapter 192.168.1.66
Select TFTP server tab
Usuming you have the router connected to the network, and turned off.
Hold the WPS/Reset button while powering up the router and continue to hold it down for around 10 seconds.
If everything went worked OK you will see it force the firmware back into the router.

The router will reboot and you will now should be able to log back into the router with its default IP address 192.168.1.1

Worked for me hope it worked for you
Saturday, February 9, 2013
Dial Tone Short Pulses New Telstra Bundle
A friend recently connected a new land line phone and Internet bundle.
Once the modem was delivered he ran the CD and followed all instructions, the Internet was up and going within minutes.
It also came with a card which gave him the preconfigures WiFi password.
Next it was time to test phone line.
The phone had white noise coming from the handset.
I asked him if he had other phones in the house, he did and discovered that it did not have a phone filter installed.
He installed another phone filter on the other line and the white noise was gone.
Next he tested the phone but noticed the dial tone was not right, he heard short pulses on the line.
I told him that he needed to disable message bank.
He rang Telstra and they said it would take a week.
This by default should have been switched off, if not the salesman should have asked the question.
This whole process of organizing a new connection etc took long enough as it was, without having to ring back and spend more time on the phone to resolve.
Hopefully someone from Telstra is reading this and stops silly mistakes like this.
If you are not going to setup message bank for the customer then disable it.
Sunday, January 20, 2013
Billion Event Logs
Jan 19 23:14:05 home.gateway:firewall:info: 747651.345 Blocked Prot=6, 192.168.2.3:49155 > 17.172.233.115:5223, APF Seq=-67676071, Ack=2084017848 -No Existing Session
 Prot6 = Tcp blocked Added port 5223 packet filter and Virtual Server - Port Forward - fixed
******************************************************************************
Jan 20 20:28:18 home.gateway:firewall:info: 824103.791 Blocked Prot=6, 192.168.2.1:7283 > 67.148.153.136:3490, A Seq=-1836629461, Ack=870554880 -No Existing Session
 Turned out EchoStar was Slingplayer
My Port 5001 was already open
Found more info on Port 3490 here: http://slingbox.wikia.com/wiki/How_to_change_the_SBCore.ini
Prot6 = Tcp blocked Added port 3490 tpacket filter and Virtual Server - Port Forward - fixed
******************************************************************************
Jan 20 21:12:33 home.gateway:firewall:info: 826759.140 Blocked Prot=6, 192.168.2.100:35874 > 27.111.254.110:5223, A Seq=506404947, Ack=1574390106 -No Existing Session

Seems to belong to Tivo?
I have emailed them I will keep you posted.
I did forget to open this port.see my old blog tivo ports:http://lozaelec.blogspot.com.au/2012/04/tivo-guide-will-not-update.html.
Prot6 = Tcp blocked Added port 5223 to packet filter and Virtual Server - Port Forward - fixed
******************************************************************************

******************************************************************************
Jan 20 20:28:18 home.gateway:firewall:info: 824103.791 Blocked Prot=6, 192.168.2.1:7283 > 67.148.153.136:3490, A Seq=-1836629461, Ack=870554880 -No Existing Session

My Port 5001 was already open
Found more info on Port 3490 here: http://slingbox.wikia.com/wiki/How_to_change_the_SBCore.ini
Prot6 = Tcp blocked Added port 3490 tpacket filter and Virtual Server - Port Forward - fixed
******************************************************************************
Jan 20 21:12:33 home.gateway:firewall:info: 826759.140 Blocked Prot=6, 192.168.2.100:35874 > 27.111.254.110:5223, A Seq=506404947, Ack=1574390106 -No Existing Session

Seems to belong to Tivo?
I have emailed them I will keep you posted.
I did forget to open this port.see my old blog tivo ports:http://lozaelec.blogspot.com.au/2012/04/tivo-guide-will-not-update.html.
Prot6 = Tcp blocked Added port 5223 to packet filter and Virtual Server - Port Forward - fixed
******************************************************************************
Saturday, January 19, 2013
Monday, December 3, 2012
NanoStation M2 Setup As An Access Point
I decided to upgrade my Nanostation 2 to the Nanostation m2.
I was so happy with the performance of the Nanostation 2 that i wanted to upgrade to include wireless N .
The Nanostation M2 mode includes IEEE 802.11 B/G/N mixed.
I have set this up as an indoor Access point
I found that the my modems wireless worked well upstairs but would not do the whole house as well as the downstairs area including the garage. I wanted something that just worked everywhere.
I disabled the wireless on the modem and configured the Nanostation m2.
I had a network connection downstairs, so it was simple to connect to the existing network.
Nanostation M2 default IP addres 192.168.1.20 or https://192.168.1.20/link.cgi.
The default username and password is ubnt
I configured the Nanostation as a wireless access point then created a wireless password.
Don't forget to change the Nanostation username and password which is ubnt.
Most people change the wireless password but forget to change the device password.
If you are having issues connecting to it even though the passwords are correct you may need to disable airMax in airMax settings and also set the channel width to 20.
This is the best wireless access point I have used.
Here is some snapshots of my configuration.


Website - https://www.ubnt.com/airmax/nanostationm/
Downloads - https://www.ubnt.com/download/
Helpful Discovery tool - https://www.ubnt.com/download/utilities
Subscribe to:
Posts (Atom)