Showing posts with label Product Support. Show all posts

Monday, April 17, 2023

Aquasphere Chlorinator No Display No Output

Fault No Display no output will not power on 


Replaced T2amp (slow blow 2Amp and 3.6V V80h Varta Rechargeable Battery With 2 Pin PCB Mount 


I found the instructions here : https://www.blpumps.com.au/wp-content/uploads/2020/01/Zodiac-Aquasphere-or-D15-1.pdf


Sunday, May 19, 2019

Low Battery Ness M1 Gold

The M1-kp2 lcd keypad displays Low Battery.


If it maintains a voltage above 12.2V during the test then the battery is OK, if not the Low Battery will display on the LCD keypad.

In my tests the battery measured fine with a Multimeter but this doesn't load the battery.

After the Battery test i was none the wiser, I replaced the Panel 12V 7.2 ah battery anyway and repeated the test but the display still showed Low Battery.

After a full 24 hr charge the Low Battery indicator disappeared

To Manually do a battery load test 

1) Press the ELK key then enter your Master User Code
2) Press the UP arrow key to 8-System Settings
3) Press the RIGHT arrow key then Enter the Master User Code
4) Press 4 takes you to 84-System Test
5) Press the RIGHT arrow key to enter 1:Battery Test
6) Press the Right arrow key again to start the Battery Test

Tuesday, January 29, 2019

Nvidia Shield 16GB Setup And Plex Setup

This is what I did to get my Shield setup and working correctly.

First thing is to fire up you Shield, then go to settings then Storage and reset. you will see that your 16 Gig internal storage is probably around 12 Gig or so depending on how many apps you have installed, I have around 8 Apps (3 Gig of apps).
My objective was to have all the apps and main data on its internal memory and any Plex data on a External USB.
So next was to install a and 64GB Ultra Fit USB 3 memory stick, Purchased from Altronics: https://www.altronics.com.au/p/d0397b-sandisk-ultra-fit-usb-3.0-memory-stick-64gb/

As you can see the only thing I have turned on in Storage and Reset is Transfer files over the network.


Make sure that anytime you do any work with the USB ports you Power off your Shield not just put it into sleep mod otherwise you will damage your memory stick trust me.

Power off wont be on the Right sidebar, to enable this go to System, then Customize Quick Settings, then turn on Power Off.


OK so its powered OFF, Plug the USB stick into Port 1 then turn the unit on again.

To turn it back on you will need to remove the power then re-apply.

In Storage and Reset you will now see your newly installed 64 Gig USB memory stick.

Do not format the drive as an internal drive as you will not be able access this drive from your windows PC.

In Storage and Reset do not turn on Transfer files to a computer via USB, by turning this on you will loose USB port 1, by doing so the USB port would be used to transfer files to PC only.

In your Network settings on your PC if you don't see your Shield name then see below for help.

Go to Windows Explorer and type the IP address of your Shield, to find yours go to Settings, then Storage and Reset, then transfer files over local Network, from here you will see your username and password and the IP address.


In my case \\192.168.0.81 then press enter


Key in the username and password we saw in the transfer files over local Network page


In most cases you should see your network drive by typing \\SHEILD or \\SHIELD Android TV
once you enter the IP address you may need to enter it again to see the contents

In my case\\192.168.0.81


The ONLY folder you can write to by the way is the NVIDIA_SHIELD folder.

If you have an external drive connected with media files you will need to copy them into the NVIDIA _SHIELD root folder or create a sub-folder with the NVIDIA _SHIELD.

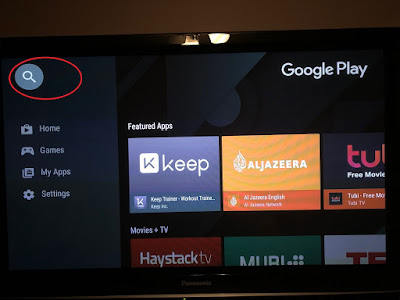
To setup Plex, go to the Google play store


Search for Plex


 Then click on Plex App to install.


From the App sign in to your Plex account on the Shield, from here it will display a code that will need to be entered into your web browser on a PC


From PC type : https://app.plex.tv, then sign in again on the PC


Enter the code provided by the shield then press Link, then wait a second and it should say LINKED


Click on Launch


Before you add any libraries we must make sure that the Plex server is running on the shield and that the Plex data is saved to New USB drive (Sandisk USB in my case) not to its internal storage.

To Check whether you Plex server is running click on your email address


Then Settings.


If the server is not started then click on it to start, in the below picture you can see that the Plex server is running. We also need to change the Plex Storage location from Internal to the newly created USB Storage. 


We are nearly ready to open Plex and start adding Libraries, first we need to change a few things.

From the https://app.plex.tv/desktop, Go to Plex Settings 


In My case the local media would not work using Personal Media as metadata was optimized for Windows Media center, I I used Plex Movie.

 I made sure that "Local Media assets" was set to the top In Personal Media, Plex Movie, The Movie Database, Show, Artists and Albums

If they are not, select it by holding down the left mouse and move it to the top


You will need to go through all other settings to make sure they are set as you desire, as you can see i wasn't interested in video previews or chapter thumbnails as long as the movie posters were generated by Plex movie I was fine.


Scroll down to Libraries and click ADD LIBRARY


 Click on Movies, Type the folder name of your movies, in my case all movies are in separate folders.

1 Movies Pre80's
2 Movies 1980's
3 Movies 1990's
etc
So the first folder was Movies Pre80's, then click NEXT


Click on Add folders, then BROWSE FOR MEDIA FOLDER, in my case Movies directory then sub-folder Pre80's, click ADD


Now from here do not click on ADD LIBRARY, click on Advanced first


In my case I have unchecked most things, the main one you have to set is the Agent, in my case I chose Plex Movie, now click ADD LIBRARY.


If you go back to the Home page you shield see your covers appearing in the Movies Pre80's Folder.

Now all you have to do is go back and add the other folder Eg 1980, then 1990 ETC.

Complete each folder on at a time.

Shield Not Displaying Shared Folder Under Network On PC

As you can see my Nvidia Shield would not display under Network 


Even though "Transfer files over local network" was enabled I still could not see my shared Shield folders.


It was working originally for quite a while then stopped one day.

I turned off "Transfer files over local network" then back on but that didn't work.

To fix the problem I turned off "Transfer files over local network" then restarted the Shield then turned it back on.


Thursday, January 24, 2019

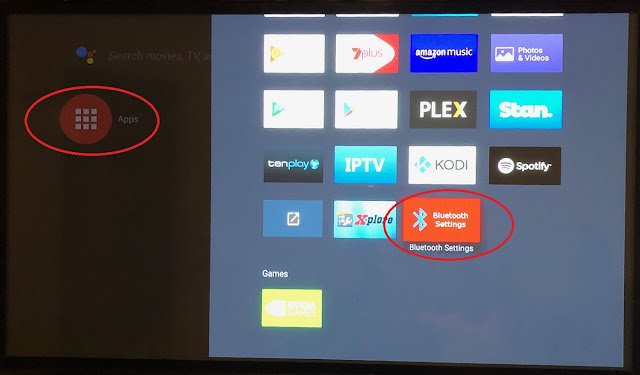
How to Disable Shield Bluetooth From Being Visible / Discoverable / Pairable

This works, it allows you to select one of the following

1) Fully Discoverable and Pairable
2) Limit to devices that are already discovered
3) Limit to devices that are already Paired
4) Completely disable Bluetooth


Go to the app store: https://play.google.com/store/apps/details?id=by4a.bluetoothsettings.tv


You need to buy the Paid version (around $3, the free version is not compatible.


 It will automatically be installed on the Shield after purchase.


And yes the remote still works, this should have been implemented by Nvidia.

Friday, January 18, 2019

Neo Wifi Motion sensor


I decided to try my luck and purchase a Wifi Motion sensor that works with Amazon, Google Assistant and IFTTT.

My goal was to setup 4 Motion sensors one on every corner of the house to detect movement and then get them to turn on a Tplink LB100 Smart Globe with a IFTTT notification once done.

LB100 Smart Globe : https://www.altronics.com.au/p/x2188-smart-wi-fi-dimmable-bulb/

Motion sensor :
https://www.ebay.com.au/itm/WiFi-PIR-Motion-Sensor-Smart-Home-Automation-Amazon-Alexa-Goole-Assistant-IFTTT/232951917916?hash=item363d042d5c:g:lH8AAOSwEVpbjNit:rk:1:pf:1&frcectupt=true

I must admit it took a few goes to get this going and the seller is not technical so you will get little help from them but I hope this helps a few people.

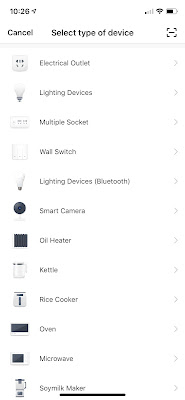
It took a day to get mine going which really should have only taken 1/2 hour at most but I didn't know which device to choose and the list was quite long and the box didn't give me any clues.

When adding the device I looked at the list and tried to find ad device that was closely matched EG Sensor, Pir, Motion Sensor, WiFi smart device and NEO (logo on the device).

I then I contacted the seller who just highlighted what the description on the box said (useless)
All I wanted her to do was to contact the supplier and ask them what device to select if the device was not listed.

The instructions needs the product list in alphabetical order and a note stating that if you can't find your product listed (use OTHER).

Anyway most of my problems came down to the Telstra Gateway modem blocking the device and the rest was because the instructions just needed that extra information.

It looks like the same instructions are used for many different devices and not one in particular.

Below I have taken shots of each page and added extra information that may help.


Register and login, then to add a device select OTHER (this was the issue it doesn't tell you this )


Its a long list of devices and its not in alphabetical order, I tried a few and they didn't work so use OTHER


When you hold down the reset button the sensor it will either flash slowly or fast.
If you hold down the reset button again it will alternate, so if it is slow the first time do it again and it will be fast.
If its flashes rapidly use Smart Wifi Mode click the Blue link at the bottom, if it flashes slow press the AP mode top right, it does matter which one you choose the AP Mode one though has a few extra steps.

In AP mode it will ask you to go back to the WiFi network settings
Select the device
You are now connected directly to the device
Now go back to the app and it will ask you to select your WiFi network and enter a password
Once done the app should automatically connect you back to your WiFi router not the device, the device will now remember the WiFi settings and you should be good to go.


When you trigger the sensor, that is move in front of it, the sensor will lights up blue then after a few seconds it will send it to the WiFi router which will then send you a notification on your mobile.

If you are not getting the notification then check you have white-list the sensor, if you go into your router you can add the Mac address to while-list.

In my case it added the device but it would not send the notification until I added a least one sensor into the Telstra modem.

To do this sign into your Telstra router, select advanced


Then WiFi


Scroll down and change ACL to white-list, then enter the mac address (see below) of the device, then either click on the small blue Plus icon or click on Add new Mac address button.

To find the Mac address, Go to the Smart Life App, click on a device, click the edit icon in the top right, then scroll down to Device Information, you will need to add the 6 sets of alphanumeric values in separated by : (Colon) Eg R2:E5:66:7K:M5:99

By the way the seller was responsive and I would purchase another unit from her as the parcel arrived quite quickly. 

I connected the app with IFTTT and it turns on a light when triggered.
The only problem with IFTTT is I couldn't set a time period which means this would turn on the light during the day as well. This was a huge problem at the moment as I can go into the TP-Link Kasa app and turn off the light after I receive the motion Smart Life notification.

These are not really intended for outdoor use and can miss-trigger due to things like tree branches or sunlight, so be careful where you place them and undercover of course.

If the alarm notification are doing your head in,  go to phone settings, then notifications, then Smart Life and turn off sounds, that way you get silent notifications.