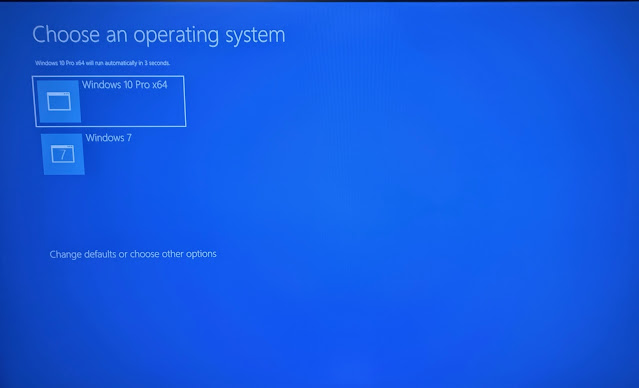
Your Pc asks you each time to selct either windows 7 or windows 10 at boot.
Fix
Go to Start, type Msconfig, select System Configuration.
Your Pc asks you each time to selct either windows 7 or windows 10 at boot.
Fix
Go to Start, type Msconfig, select System Configuration.
Have you ever tried transferring files between PCs on a network, only to watch the speed drop to zero or crawl at an agonizingly slow pace? It’s frustrating..
Recently, I encountered this issue while moving files between two networked Windows PCs. After some troubleshooting, I found that mixed RAM capacities in the system played a role, but there were also network-related factors slowing things down. Here’s what I learned and how you can fix similar issues.
One of the first things I did was run a memory test. While the test showed the RAM was functioning correctly, I noticed something unusual—two of the RAM sticks were 2GB each, while the other two were 8GB each.
Why is this a problem?
Mixing different RAM capacities forces the system to run at the speed of the slowest module.
This can impact overall performance, including network file transfers.
For optimal performance, it’s best to use RAM sticks with the same capacity and speed.
Mixing RAM modules of different sizes, like 2GB and 8GB, is possible but may not provide the best performance.
Many modern motherboards support dual-channel memory, which boosts speed by running paired RAM sticks together. However, when using different capacities, only the matching portion operates in dual-channel mode, while the remaining memory runs in single-channel mode.
Although this setup works, it can reduce the benefits of dual-channel performance and may slightly impact system stability. The motherboard has to manage the memory asymmetry, which can lead to less efficient performance overall.
https://www.techpowerup.com/download/techpowerup-memtest64/
If you're looking for a unique and memorable Gmail domain name, here are a few tips that might help:
Make it personal: Use your own name or initials as the basis for the domain name. This can make it easy for people to remember and differentiate your email from others.
Use a combination of words: Create a domain name by combining two or more words that are relevant to you or your business. For example, if you're a graphic designer, you might consider using words like "graphic," "design," or "creative" in your domain name.
Get creative: Use your imagination to come up with a unique and memorable domain name. This can be a fun way to express your personality and stand out from the crowd.
Keep it short and simple: A shorter domain name is easier to remember and type, so try to keep it as concise as possible. Avoid using complex words or phrases, and try to stick to simple, straightforward language.
If the audio icon in the system tray of your Windows computer has a red "X" on it, it means that there is a problem with the audio system. This could be caused by a variety of issues, such as a conflict with the audio driver, a problem with the audio hardware, or a problem with the audio settings.
To troubleshoot this issue, you can try the following steps:
Restart your computer: Sometimes, a simple restart can fix problems with the audio system.
Check your audio hardware: Make sure that your speakers or headphones are properly connected to your computer, and check for any visible damage.
Check the audio driver: Right-click on the audio icon in the system tray and select "Playback devices." This will open the Sound control panel. Click on the "Properties" button for your default audio device and then click on the "Driver" tab. Make sure that the driver is up to date and not disabled.
Check the audio settings: In the Sound control panel, click on the "Communications" tab and make sure that the "Do nothing" option is selected. This will prevent Windows from automatically muting the audio when it detects that you are using a communication application.
Check for malware: Run a malware scan to make sure that your computer is not infected with any malicious software that could be causing problems with the audio system.
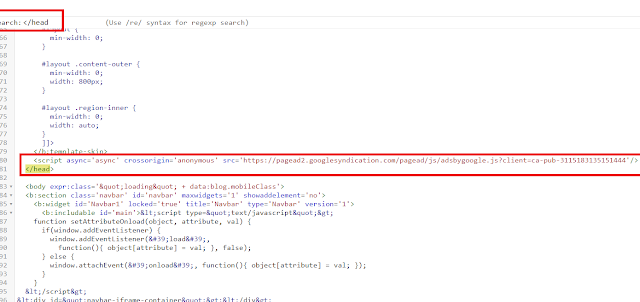
To add an AdSense account to your Blogger blog, follow these steps:
Sign in to your Blogger account.
Click on the "Earnings" tab on the left hand side
Click on the "Create AdSense Account" button.
Follow the prompts to sign in to your AdSense account (or create a new one if you don't already have one).
After you have signed in to your AdSense account, you will be taken to a page where you can configure your ad settings. Choose the ad formats and placements that you want to use, and then click the "Save" button.
You should now see your AdSense ads on your blog. It may take a few hours for the ads to start showing up, so be patient.
https://www.google.com/adsense/
Sign in to your Blogger account and select the blog you want to edit.
Click on the "Posts" tab in the left-side menu.
Click on the "Categories" tab.
In the "Categories" tab, you can either create a new category or select an existing one. To create a new category, type the name of the category in the "Add a Category" field and then click the "Add" button.
To assign a post to a category, go to the "Posts" tab and click on the post you want to edit.
In the post editor, click on the "Categories" tab.
Select the categories that you want to assign to the post and click the "Save" button.
***********************************************************************
In Blogger, categories and labels are similar in that they allow you to group your blog posts by topic. However, there are some differences between the two:
Categories are hierarchical, meaning that you can create subcategories within categories. For example, you can create a category called "Technology" and then create subcategories called "Mobile phones" and "Computers" under it.
Labels are flat, meaning that you can't create sublabels. You can only create a single level of labels.
When you enable categories in your Blogger blog, you can set a default category for your posts. This means that all new posts will be automatically assigned to the default category unless you specify a different one. With labels, you need to manually assign labels to each post.
To use labels in Blogger, follow these steps:
Sign in to your Blogger account and select the blog you want to edit.
Click on the "Posts" tab in the left-side menu.
Click on the post you want to edit.
In the post editor, click on the "Labels" tab.
Type the name of the label in the "Add a Label" field and then click the "Add" button. Repeat this step to add more labels to the post.
When you're done adding labels, click the "Publish" button to publish your changes.
If you want to create a unique Gmail address, you can use a custom domain name instead of the default @gmail.com. You can purchase a domain name from a domain registrar and then set it up with Google Workspace (previously known as G Suite). With Google Workspace, you can use Gmail with your own domain name and also get access to other productivity tools such as Google Drive, Calendar, and Meet.
To set up a custom domain with Google Workspace, follow these steps:
Purchase a domain name from a domain registrar such as Google Domains, GoDaddy, or Namecheap.
Sign up for Google Workspace and follow the instructions to set up your custom domain. You will need to verify that you own the domain by adding a TXT or CNAME record to the DNS configuration of your domain.
After your domain is verified, you can create Gmail addresses for your domain, such as info@yourdomain.com or sales@yourdomain.com.
You can also set up other Google Workspace services for your domain, such as Google Drive and Calendar.
Videos you copied to you iPhone can be now found in the TV app.
The folder used to be called Videos
I friend contact me about her Dell desktop computer which was running slow and the task manager was showing 100%.
There didnt seem to be any program that was slowing the cpu, so i got her to check if windows was doing an update and it seemed to have some Dell updates that had failed.
I ended up getting her to remove all dell software then rebooted the pc
I then disabled windows search, ran a checkdisk, rebooted and all was good.
I found this website that helped me with some of the above steps
https://www.cleverfiles.com/howto/100-disk-usage-windows-10.html
*******************************************************************************
To run check disk in dos
In the search type "cmd" then press enter, right click on "Command Prompt" then click on "Run as administrator" press enter
1) In Search type CMD, then select Command Prompt
From c:\windows\system32> type net share
If your computer is still working and you can access the Hard drive install Belarc: https://lozaelec.blogspot.com/2011/06/lost-your-windows-software-key.html
If your drive is currupt or dead, install a new hard drive then reinstall the correct version of windows either home or pro if not it will not activate,
Install windows 10 without internet connected and when it asks to activate windows 10 select do it later.
As long as your mother board has not been replaced your product key should be embedded in your Bios
Once windows 10 is installed
1) Go to Search type cmd, then right click on Command Prompt, then select Run as administrator
Next type or copy and paste: wmic path SoftwareLicensingService get OA3xOriginalProductKey
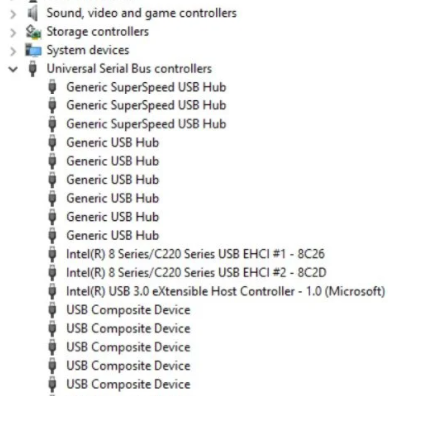
Must be done from c:/windows\system32 folderYou have tried everything, updated drivers, remove driver and rebooted, bios update etc, but you can't get rid of the exclamation mark on Generic Superspeed USB Hub
The usb port just doesnt work porperly or stops after it starts up the device.
Something has caused the usb port to limit the USB hub and turning off the pc doesnt help.
You need to remove the power from the motherboard and the way to do this is to turn off the power at the powerpoint then turn back on, see steps below if needed.
Shutting down the pc then back on does not remove the power from the motherboard.
1) Shutdown the pc
2) Turn the power off on the power switch on the back of the power supply and remove the mains lead
3) Hold down the PC power button for 15 seconds (there is no power but this will remove any residual power from the power supply.
4)Plug the mains lead back in and turn on the power switch on the back of the power supply, then press the pc power button on computer