Tuesday, January 3, 2023

Windows Audio Has A Red X In System Tray

Every time you turn the computer on, a red X appears on the Windows Audio speaker


If you click on the icon the troubleshooter will solve the issue, but you would need to do this every time.

You need to check if the windows Audio Service is started, so before you click on the speaker icon
Go to Start, then type services, double click on the services.


Double click on Windows Audio

As you can see from the below picture that the Windows Audio Service is on Automatic but has failed to start.


If the audio icon in the system tray of your Windows computer has a red "X" on it, it means that there is a problem with the audio system. This could be caused by a variety of issues, such as a conflict with the audio driver, a problem with the audio hardware, or a problem with the audio settings.

To troubleshoot this issue, you can try the following steps:

  1. Restart your computer: Sometimes, a simple restart can fix problems with the audio system.

  2. Check your audio hardware: Make sure that your speakers or headphones are properly connected to your computer, and check for any visible damage.

  3. Check the audio driver: Right-click on the audio icon in the system tray and select "Playback devices." This will open the Sound control panel. Click on the "Properties" button for your default audio device and then click on the "Driver" tab. Make sure that the driver is up to date and not disabled.

  4. Check the audio settings: In the Sound control panel, click on the "Communications" tab and make sure that the "Do nothing" option is selected. This will prevent Windows from automatically muting the audio when it detects that you are using a communication application.

  5. Check for malware: Run a malware scan to make sure that your computer is not infected with any malicious software that could be causing problems with the audio system.


PassMark Software's benchmarks

PassMark Software is a company that provides performance benchmarking software for computers and other electronic devices. The company's website, https://www.passmark.com/, offers a range of tools for measuring the performance of CPUs, graphics cards, hard drives, and other hardware components.

To get started with PassMark Software's benchmarks, you can follow these steps:

Go to https://www.passmark.com/.

Click on the "Benchmarks" link in the top menu.

Select the type of benchmark you want to run from the list on the left side of the page. Options include CPU benchmarks, 2D graphics benchmarks, 3D graphics benchmarks, and more.

Click on the specific benchmark you want to run. This will take you to a page with more information about the benchmark and a link to download the benchmark software.

Download and install the benchmark software on your computer.

Follow the instructions to run the benchmark and see the results.

How To Add Adsense Account Blogger

To add an AdSense account to your Blogger blog, follow these steps:

Sign in to your Blogger account.

Click on the "Earnings" tab on the left hand side

Click on the "Create AdSense Account" button.

Follow the prompts to sign in to your AdSense account (or create a new one if you don't already have one).

After you have signed in to your AdSense account, you will be taken to a page where you can configure your ad settings. Choose the ad formats and placements that you want to use, and then click the "Save" button.

You should now see your AdSense ads on your blog. It may take a few hours for the ads to start showing up, so be patient.


https://www.google.com/adsense/


Click "Get code" then Click "Copy Code Snippet"


Make your way to Theme then Click Customize then Edit HTML

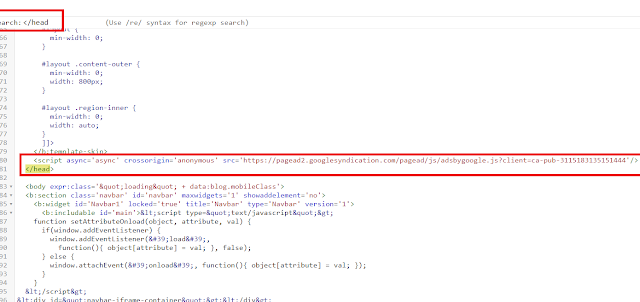
We need to paste the code in between the <head> and </head> on your site (use your code as above)

Click anywhere on the HTML code then press CTRL and F


Search will appear in the top left type </head> no paste the code above </head>


AudioBooks on iPhone

There are several ways to listen to audiobooks on an iPhone. One way is to use the Apple Books app, which comes pre-installed on all iPhones. To listen to an audiobook using the Apple Books app:

Open the Apple Books app.
Tap the "Audiobooks" tab at the bottom of the screen.
Find the audiobook you want to listen to and tap on it.
The audiobook will begin playing. You can use the controls at the bottom of the screen to pause, adjust the volume, or skip to a different part of the audiobook.
You can also use other apps, such as Audible, to listen to audiobooks on your iPhone. Audible is a popular app that offers a large selection of audiobooks, and it has features such as the ability to adjust the playback speed and automatic bookmarking. To listen to an audiobook using Audible:

Download the Audible app from the App Store.
Sign in to your Audible account.
Find the audiobook you want to listen to and tap on it.
The audiobook will begin playing. You can use the controls at the bottom of the screen to pause, adjust the volume, or skip to a different part of the audiobook.
Both the Apple Books app and Audible allow you to download audiobooks for offline listening, so you can listen to them even when you don't have an internet connection.

To Add Categories To A Blog In Blogger

 Sign in to your Blogger account and select the blog you want to edit.

Click on the "Posts" tab in the left-side menu.

Click on the "Categories" tab.

In the "Categories" tab, you can either create a new category or select an existing one. To create a new category, type the name of the category in the "Add a Category" field and then click the "Add" button.

To assign a post to a category, go to the "Posts" tab and click on the post you want to edit.

In the post editor, click on the "Categories" tab.

Select the categories that you want to assign to the post and click the "Save" button.

***********************************************************************

In Blogger, categories and labels are similar in that they allow you to group your blog posts by topic. However, there are some differences between the two:

Categories are hierarchical, meaning that you can create subcategories within categories. For example, you can create a category called "Technology" and then create subcategories called "Mobile phones" and "Computers" under it.

Labels are flat, meaning that you can't create sublabels. You can only create a single level of labels.

When you enable categories in your Blogger blog, you can set a default category for your posts. This means that all new posts will be automatically assigned to the default category unless you specify a different one. With labels, you need to manually assign labels to each post.

To use labels in Blogger, follow these steps:

Sign in to your Blogger account and select the blog you want to edit.

Click on the "Posts" tab in the left-side menu.

Click on the post you want to edit.

In the post editor, click on the "Labels" tab.

Type the name of the label in the "Add a Label" field and then click the "Add" button. Repeat this step to add more labels to the post.

When you're done adding labels, click the "Publish" button to publish your changes.


Set Up A Custom Domain With Google Workspace

If you want to create a unique Gmail address, you can use a custom domain name instead of the default @gmail.com. You can purchase a domain name from a domain registrar and then set it up with Google Workspace (previously known as G Suite). With Google Workspace, you can use Gmail with your own domain name and also get access to other productivity tools such as Google Drive, Calendar, and Meet.


To set up a custom domain with Google Workspace, follow these steps:


Purchase a domain name from a domain registrar such as Google Domains, GoDaddy, or Namecheap.


Sign up for Google Workspace and follow the instructions to set up your custom domain. You will need to verify that you own the domain by adding a TXT or CNAME record to the DNS configuration of your domain.


After your domain is verified, you can create Gmail addresses for your domain, such as info@yourdomain.com or sales@yourdomain.com.


You can also set up other Google Workspace services for your domain, such as Google Drive and Calendar.

Monday, November 14, 2022

Bitvision Playback - This Function Is Not Supported, Please Use The Control To Play

If you get this message when you try to playback footage from your NVR, "Watch Video Below"

"This Function Is Not Supported, Please Use The Control To Play"


https://youtu.be/XON_HROTXYo

If you dont have LsNXVRPlugin  direct  at location C:\Program Files (x86)\LsNXVRPlugin

or C:\Program Files\LsNXVRPlugin then cick Download plugin then run the Plugin

LsNXVRPlugin_V21.2.12.210616_R30.exe


.