Showing posts with label Security. Show all posts

Friday, February 9, 2018

Enable Infrared On Hikvision Camera

Login to Camera in my case I enter http://192.168.1.101


Make your way to Maintenance, then System Services, then select Enable IR Light


Enable Infrared On Avtech Camera

First login into your camera, in my case I enter http://192.168.1.100 into my browser


Then enter your username, password and then Verify Code


At the top of the screen select Config.


Select Advanced under Camera options


Select Auto under IR Control, then set desired IR extend time and Turn on Level


Thursday, June 1, 2017

Hikvision Camera Default Video And Snapshots Location


Log into your camera, Click on Local and check your default location.

This is actually your Virtual location.

C:\Users\your username\AppData\Local\Microsoft\Windows\Temporary Internet Files\Virtualized\C\Users\Your username.

eg: C:\Users\laurie\AppData\Local\Microsoft\Windows\Temporary Internet Files\Virtualized\C\Users\laurie\Hikvisionsave


Sunday, April 2, 2017

Hikvision Default IP Address

The default IP address for my Hikvision DS-2SC2142FWD-I was 192.168.1.64

Use SADP tool to detect the camera and change it.


In this example I have clicked on the first camera, as you can see the parameters for the camera are on the right.

You can now change the default IP address and or port to one that matches your network.

In my case computers are on the default network of 192.168.2. ... network so the first camera I placed was on 192.168.2.100

Place the camera on a high IP address so to not interfere with the DHCP IP addresses given to your equipment by your modem.

Your modem will accept a range from 192.168.2.1 - 192.168.2.254 usually you don't use the first few or the last few IP addresses as these are often used by the modem.

Other IP Eg. 192.168.2.1 - 192.168.2.254  or 192.168.3.1-192.168.3.254 or 10.0.0.1-10.0.0.254


As you can see I have also changed the default Http port to 4000 on the first camera so that way I can port forward this in my modem instead of the usual port 80.

Most people will leave this as port 80

My Billion modem I have 2 areas to port forward one called Security / IP filtering incoming and the other Nat / Virtual servers.


To access the cameras locally through you web browser I would enter http://192.168.2.100:4000

The Port 2000 is for the IVMS-4500 app


The the address field enter your Static Wan IP not your local IP address eg 192.168.2.100 as the app will only work locally. When you enter the Wan IP address the app will work remotely and locally.

Tuesday, March 21, 2017

M1 Gold Will Not Arm Or Disarm

Run ElkRp

Make sure that Access is not ticked otherwise you wont be able to arm or disarm the panel via the keypad or the eK Pro app.


Monday, January 18, 2016

HikVision Enable Recording Quick Guide

As you can see the iVMS-4200 software is telling me that one of the camera is not setup to record.


Log into your camera from your web browser

If you haven't changed your Http port to port 80 then it will be your IP address you have assigned for that camera.

Mine is 192.168.2.55:5000 if I hadn't changed the Port from 80 to 5000 Mine would be 192.168.2.55

I found it easier to enable the recording settings by logging in from the web browser as I couldn't find it in the iVMS-4200 software.

Select Configuration, then Record Schedule, then edit

From here you can assign the type of recording, most common is Motion Detection which records snapshots.


I prefer to have continuous recording as I don't want to miss anything, so I have chosen Continuous and all days.


You will need to make sure you go Basic Event, then enable motion Detection and then draw the areas you want to detect.


Friday, January 15, 2016

HikVision DS-2CD2132F-IWS and DS-2CD2142FWD-I Port Forwarding

Port Forwarding for most models should be the similar.

Below I have port forwarded three cameras, both http ports and server ports have been forwarded.

Instead of using the standard Http port 80 I have chosen my own ports for each camera.


No1 : Hikvision Garage camera

Http port : 3012
App (Server port) : 3013

No1 : Hikvision Hotwater camera
Http port : 3010
App (Server port) : 3011

No1 : Hikvision Kitchen camera
Http port : 3009
App (Server port) : 3008


In some cases, as in my case, port forwarding is done in two places.
Most modems will probably only have to port forward in the Nat/Virtual server area.

1)Security/ IP Filtering Incoming
2)Nat/ Virtual Servers


IVMS-4500 iPhone App : https://itunes.apple.com/au/app/ivms-4500-lite/id441697527?mt=8


 IpCamViewer : https://itunes.apple.com/au/app/ip-cam-viewer-pro/id402656416?mt=8
 
If you are using IP CamViewer, you will need to port forwarded the Http ports as well


Thursday, December 24, 2015

Loza's Ness M1 Quick Help Guide

My M1 Helpfull notes

I was sick of reading the whole user and installation manual and other PDF's to find the answers I needed.

*********************************************** Ports to Forward


PortUseRoutingProtocol
2601Encrypted communications port Configurable by installer. 2601 is the default.Route outside to connect with NessRP and web browser through Internet/WAN.TCP
21M1XEP Firmware UpdatesRoute outside if ElkRP will connect via Internet/WAN to download firmware updates to the M1XEP.FTP/TCP
2101Plain text communications port. Configurable by installer. 2101 is default.Not be port orwarded outside the local networkTCP
26Web BrowserRoute outside to connect with web browser through Internet/WAN.TCP
2632The M1XEP listens on this port to respond to UDP a "FIND" Command.Not be port orwarded outside the local networkUDP

**************************************************
Having trouble comunicating between EKPRO app and the panel

Before beginning the M1XEP setup, please ensure that the Control is programmed to transmit ASCII strings
at 115,200 baud for each of its available conditions to allow the M1XEP to provide access to the information.

Using the Keypad Installer Programming, or the ElkRP software, access the Globals Menu (Menu-07) and program yes for options 35, 36, 37, 38, 39, and 40. Verify that Option 34 is set to 115,200.

Place a tick in Event log through to Keypad keys

These need to be enabled so that the M1 tells Keypad when a zone status has changed.


************************************************ 

Programming / Installers code : The Default is 172839
The serial number / RP Access Code : The Default 246801


M1XEP DHCP IP address : The Default is 192.168.0.251

Non-Secure Port : Values between 1024 and 49151 are valid : The Default is Port 2101 (Do not Map outside the local network)

SSL or Secure Port for encrypted communication : Values between 1024 and 49151 are valid. The Default Port is 2601.

************************************************ 

Great desktop program for your Ness M1 is the Elk M1ToGo : http://www.elkproducts.com/product-catalog/m1togo-user-interface-for-m1controls

Click on the Connect Local button


 M1ToGo will do a quick search


From here click on Connect, this will use your insecure port 2101, you will need to enter your user code into M1 User Code see below.


Your user code is found here


Or if you prefer a Secure Login, Tick Use Secure Connection, you will still need to enter your M! User Code as Above.

You will see that the port has now changed to Port 2601.


Click connect, you will prompted to enter a secure username and password.


Your secure username and password is found here.


Be Careful to user correct letter case, as you can see Loza has capital "L"


************************************************ 
If you have accidently deleted you account and its now asking for a username and password
and you happened to have Elkrp2 on another computer maybe a laptop, you can copy and paste the files from laptop back over to the pc which is having issues, make sure you take a backup first.

If it has been a while since you were connected you may be missing some updated information.
Make sure when you do log back in, that you press Receive all, then Receive all Globals first otherwise you will overwrite the information in the panel.


Files found : C:\ProgramData\RP

It worked for me

************************************************ 


Thursday, October 15, 2015

Swann SWHOM-DRIVE2 Modified With Relay Output

This Home /Office /driveway alert system gives you the best of two alarms.

The doorbell that tells you when someone is at your doorstep and the 2 PIR detect movement in two zoned areas.

The Indoor Alarm Receiver detects signals sent from the PIR sensors and doorbell

Led indicators on the receiver give you a visual response for the detected signals, either zone 1, Door bell or zone 2

This unit will chime a sound when motion is detected or it can be placed in silent mode with a visual indicator only.

The doorbell has 16 selectable chimes amd an adjustable volume slide switch  (Low, Medium and High).

It has a great value price of $49 from Bunnings.


1. Sensor 1 LED Indicator
2. Doorbell LED Indicator
3. Sensor 2 LED Indicator

If you would like to add a relay output then see below


I have connected this as a Normally closed switch to my Ness M1 Alarm Automation Panel and created a rule to email me when the zone became non secure.


When either of the zones 1 or 2 detect motion the receiver unit send voltage to the BC548 transistor which then sends 4.5v to the Relay which open the contacts on the Alarm Zone.

You will need to make sure that the sensor is under cover (Carport would be good) as it seems to trigger on hot days depending on angle of the sun.


Tuesday, August 18, 2015

Longse S 9837 Camera Setup Connect To A Network

First you will need to connect the camera to your network.

This is a POE network camera, which means it gets its power from a POE switch.
You will either use a POE switch like this one found at Altronics D 4212 (8port switch with 4 POE ports) or use a 12v Plug pack (power supply).


http://www.altronics.com.au/search/all/?sr=poe

Once connected to your network run the search tool found on the the CD provided with the camera.

There may be a couple search tools so go through the folders on the CD.

Now unless your Computer network is on the same network range as the camera you will probably need to temporarily Change it to set up the camera.

Please make sure you take a photo of your settings before you change any setting.

Here is a video to help: https://youtu.be/--niQ9jxBw0

SEARCH TOOL

IPCSearch.exe : https://drive.google.com/file/d/0BwjqRgkVKt1IY0dkQ2ZHR2dDb2M/view?usp=sharing

IPCSearch(1).exe : https://drive.google.com/file/d/0BwjqRgkVKt1IQnBuc1lzeFp0TFE/view?usp=sharing

Other useful tools

Nmaphttps://nmap.org/download.html
wakemeonlan : http://www.nirsoft.net/utils/wakemeonlan.zip
Mobile : iNet Network Scannerhttps://itunes.apple.com/au/app/inet-network-scanner/id340793353?mt=8
iSpy : http://www.ispyconnect.com/download.aspx


Sunday, August 16, 2015

EasyN Model EasyN-H3-137V Setup

Firstly download and install the EasyN P1 app


Click on Add Camera, then QRCode.

Scan the QRCode on the side of the camera.


Type the password on the side of the camera under the QRCode usually admin, then press save, then Done


Click on the (i)

Now plug in your camera into the LAN port (network connection into your modem/router)

Click on Reconnect until the camera says Online, now click on Advanced Setting


Click on WiFi, then select your Wifi network


Enter your Wifi Password, then click Join, then click back 3 times.

Disconnect from the wired LAN connection as your camera should now work on the wifi network.


Click on Camera, your camera should now appear

When you swipe your finger left, right, up or down then camera will move.


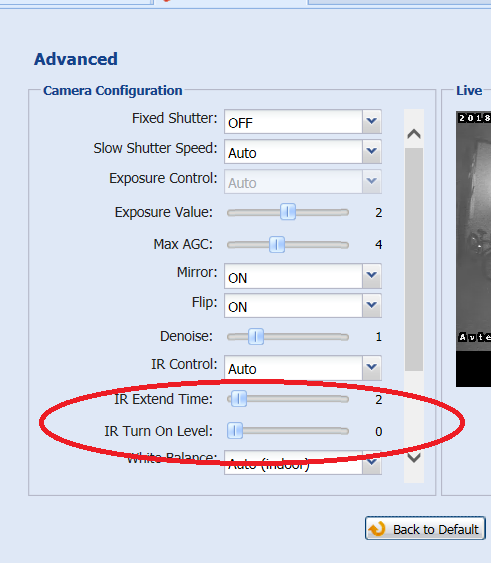
Some Advanced Settings Screenshots


There are more Advanced settings but you will need to log into the camera to change these.

To do this you will need to find your cameras IP address.

On your computer you can use a free scan tool wakemeonlan : http://www.nirsoft.net/utils/wake_on_lan.html
direct link : http://www.nirsoft.net/utils/wakemeonlan.zip

Or on you Mobile you can use iNet Network Scanner : https://itunes.apple.com/au/app/inet-network-scanner/id340793353?mt=8

Once you find your EasyN cameras IP address type the Ip address into IE, FireFox, Google or Safari Browser then ":81/web/admin.html"

Eg Http://192.168.2.20:81/web/admin.html

Username and password is admin

Click On settings

Then Compatibility view

Enter the IP Address of the camera then add


Click on Sign In

Then the settings button 

This is what it looks like in non compatibility view 


This is what it looks like in compatibility view 


Click on Options


To reset the camera to default, turn the unit upside down and use a paperclip to reset the unit.

This can also be done from the settings menu as well.

System Settings, System Maintenance, Default Values.