Showing posts with label Product Support. Show all posts

Thursday, January 17, 2019

First Generation Chromecast Setup

First thing is to connect the Chromecast to the TV to a spare HDMI port then attach the usb either into the TV if it has enough power or directly into a USB charger like an iPhone charger.

Some TV port do not have enough current to operate the device ore may fail after a period of time so connecting it to a USB charger would be preferable.

Switch the TV to the correct HDMI channel

Download the google home app if you have done so already - the old Chromecast app or Chromcast/setup from you browser will not work any longer and will probably get you to download the Google Home app anyway.

The TV will display SET ME UP


If you unit has done an update you will see this screen instead.


If your device has been connected once before and you want to reset the device, while powered hold the reset button down on the Chromecast for at least 20 seconds, the TV will display that its about to do a factory reset.

Once ready Connect to the Chromecast in your phone WiFi settings


Now back to the Google Home app and press ADD


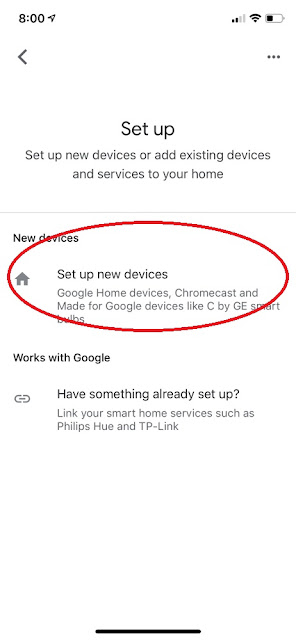
Select Setup up device


Select Setup up new devices

In my case I have already setup devices in Home so i selected home.


 Its telling you to go to the TV and see if J2N2 is displayed on the screen if so click YES


Now select a name you want to call the device in my case Office click next


Its now going to switch back to your home Wife but needs to lock in the WiFi password.

Select your networks WiFi then enter the password then Next

The TV may display it needs an update if so wait for the update to do its thing.


The Google Home app will also show its updating


Ready to cast press Continue
  Press finish Tutorial

To test go to YouTube, find and play a video then press cast on the app to right.

Click the screen once to bring up the cast button


Wednesday, October 5, 2016

IPS 001 IP Video Door Phone

There are different ways to connect the unit to your Phone, you can connect the unit via the network cable and set up the Wifi and network settings or connect to it via QR code which on the back of the doorphone.

The only issue is that the QR code would fade in time or if the camera stops responding you would need to disconnect the unit and wiring.

I decided I wanted to connect my unit as WiFi Connection only, I wanted to make sure I could reset and reconnect the unit without pulling it off the wall.

My only issue was getting the unit into AP mode.

What the video will show is how I connect and reset a camera doorphone and how I get the unit into AP mode without disconnecting the unit from the wall.


Username by default on mine was Admin (Capital A) password 88888 instead of the default 888888

Instructions : https://www.dropbox.com/s/2hvsxqfb55wmzje/English%20USER%20Manual.pdf?dl=0

https://youtu.be/rbFVpTupAOI


If you have problems with it not displaying a picture but it seems to be connected it may have been setup on another IP address.

I originally set this up the Doorbell on a 192.168.1.... network in the old house but in the new house it was on a 192.168.0..... network but the device does show you the IP address it is connected on so that is why the camera shows up in the App but there is no picture and as it was on a different network the camera would not come up in the network IP  scanner tool.

When run for first time you will need to allow access to local private network


As you can see the search tool (hicamsearcher.exe) has picked up the IP address of  192.168.1.97


This was the old networks fixed IP address for the DoorPhone.
if you double click on the IP address or key in its IP address into your browser you can reconfigure the device.

If you get this error message its because your computer is on a different network.


Temporarily change your PC's IP address so that you can access the Doorphone.

Click on network and sharing


The password will be the one that you originally set the unit up with once you have logged in you can go to System and change the password then Parameters and change the IP address to Dynamic (DHCP) instead of Fixed Ip Address.

In my configuration I disabled the Wifi and changed my Lan connection to Dynamic


Search tool : That comes with the unit ( hicamsearcher.exe) please see below Software CD link
Software CD : https://www.dropbox.com/s/4rgi6ojtyxdm3zw/From%20CD.zip?dl=0

Doorphone Video Player : https://www.dropbox.com/s/s5moe4hdap5mmo5/IPDoor.zip?dl=0
If the webclient Active X Control Module prompts you after installation click Allow for all websites.


Saturday, September 5, 2015

8Ware Wifi Mains Socket Issues Connecting

WiFi Smart Socket 8WD-IWSS001 - Using HF-LPB100 WiFi Module - Hi-flying electronics technology Co.,Ltd

If a previously paired Smart-Point does not connect or you having issues connecting to the device read on.

Plug the unit into the PowerPoint, the unit will flash either red slowly, blue slowly, red fast or blue fast.

Hold down the button on the smart point for 5 seconds, it should be rapidly flashing red, then hold the button on the smart point for 5 seconds again until you see it rapidly flashing blue.

You are now in AP mode.

You are trying to connect directly to the device so you can tell it what your wireless SSID and password it will be using.

Go to settings on your mobile click on WiFi.

You should see SMART-POINT as a WiFi access point click on it.

You have now connected to the Smart-Point, instead of your WiFi router.

Click on the "i".


The default IP on my Smart-Point was 10.10.100.150.

I selected the DNS server and added my default gateway of my modem 192.168.2.254 yours may be 192.168.1.1


Now click on the Smart-Point app .

On the Smart Setup page click on AP.


WiFi search should take a second and find your network- it will say searched successful.


Your WiFi router will automatically appear. 

Enter your WiFi password, then click done, then OK.

Very important 

Go back to your wifi settings you should now see it change back from Smart-Point to you wifi access point.

If not connect to it now.

Go back to the app

If at the Ap Settings tab, Click Back.


At the Smart Setup page, click Search Socket .


It will detect the socket, click OK to synchronize and add this new socket.


The unit will restart on your WiFi network, automatically.

On the apps main page, click on the large button it should switch from red to blue and vice versa.

Click the button on the smart point Device it should turn solid blue or solid red.


Now you can go back to the app and set the timing rules.

I have set mine to automatically only turn off the smart point at 8.30am in the morning once everyone has left the house, at that time and I didnt want someone to leave the hair straightener on.


You don't need to have an ON time in this case or the iron will turn itself on (Disaster).

This is great if a family member rings you to say they may have left the straightener on, you can now check to see its status and turn it on or off remotely:)


Saturday, July 6, 2013

Cannot Add Videos Xbmc

You are trying to add an SMB network location into Xbmc on Apple TV
This is on the default skin : Confluence
You clicked on Videos, Files, add videos, browse then scroll to Windows network (SMB) but you get : Error 2 - Share not found or Operation Timed Out or Could not connect to network server.

First thing you can try is restoring the apple tv settings hopefully you installed aTV flash (black)
and have backed it up at one stage.
Go to Maintenance then settings then manage backups then restore from backup.

Warning : This will probably restore or delete any old SMB locations you had when you last saved this last restore file.

run XBMC, got to say Videos, then Files, then add videos, then browse, then this time we are going to add a network location.
In doing so it should create a new SMB location and in time fix your windows network (SMB) default search.

So click on add network location, Protocol leave as windows network (SMB), in the server name enter the pc name (in capitals if necessary), then in shared folder type the name of folder you are sharing eg Music Videos (in capitals if necessary)(must be in the exact case as shared on the drive, then enter the username and password for that folder if needed.
click ok

Your computer name can be found at Control Panel\All Control Panel Items\System or go to Start then search for "system"


Wednesday, January 2, 2013

Dnla Device Sharing Panasonic

On the panasonic Blu-Ray Disc Player/HDD Recorder you need to enable home sharing.
On the remore click on Function Menu, then


Click start, then Control Panel, Network and Sharing Centre, choose homegroup and sharing options, Tick Stream my pictures, music, and videos to all devices on my home network, then under that Choose media streaming options. Click onthe device and on the right hand side change from Blocked to Allow.

To Share just a folder of your choice click on windows explorer, then right click on Videos, then properties, then click on include a folder, choose the folder of your choice.
Do the same for Pictures and Music.


Monday, December 3, 2012

NanoStation M2 Setup As An Access Point

I decided to upgrade my Nanostation 2 to the Nanostation m2.

I was so happy with the performance of the Nanostation 2 that i wanted to upgrade to include wireless N .

The Nanostation M2 mode includes IEEE 802.11 B/G/N mixed.

I have set this up as an indoor Access point

I found that the my modems wireless worked well upstairs but would not do the whole house as well as the downstairs area including the garage. I wanted something that just worked everywhere.

I disabled the wireless on the modem and configured the Nanostation m2.

I had a network connection downstairs, so it was simple to connect to the existing network.

Nanostation M2 default IP addres 192.168.1.20 or https://192.168.1.20/link.cgi.

The default username and password is ubnt

I configured the Nanostation as a wireless access point then created a wireless password.

Don't forget to change the Nanostation username and password which is ubnt.

Most people change the wireless password but forget to change the device password.

If you are having issues connecting to it even though the passwords are correct you may need to disable airMax in airMax settings and also set the channel width to 20.

This is the best wireless access point I have used.

Here is some snapshots of my configuration.


Website - https://www.ubnt.com/airmax/nanostationm/

Downloads  - https://www.ubnt.com/download/

Helpful Discovery tool - https://www.ubnt.com/download/utilities