Tpg : http://www.tpg.com.au/downloads/index.php?group=Speed%20Test
Optusnet : http://speedtest.syd.optusnet.com.au/
Telstra Bigpond : http://vic.speedtest.bigpond.net.au/
Dodo : http://speedtest.dodo.com.au/
iPrimus : http://support.iprimus.com.au/index.php?option=com_content&task=view&id=309&Itemid=103
iiNet : http://www.ozspeedtest.com/
Internode : http://www.internode.on.net/support/tools/speed_test/
Exetel : http://www.exetel.com.au/speed/dsl/adsl_hspa_service_speeds.php

Showing posts with label Phone/Modem Support. Show all posts
Showing posts with label Phone/Modem Support. Show all posts
Sunday, September 23, 2012
Sunday, August 5, 2012
VoIP 7404VNPX TPG
Login into yout modem
Click on advance, then configuration, then VoIP, then sip account.

Click on advance, then configuration, then VoIP, then sip account.

Wednesday, April 4, 2012
Port Forwarding Billion 7404vnpx
There are many modems and each have there own way to port forward.
In this example I will be using a billion 7404vnpx
Devices connected to the network : Avtech 16channel Dvr, Slingplayer, Logitech Sphere webcam, Foscam Ip camera, Tivo, Media Centre pc and many more.
Some software that I have port forwarded : Steam to me, Rdp, and Ness alarm ElkRP2, Mcontrol.
By default the Ip address for the Vnpx is 192.168.1.254
Using you browser type http://192.168.1.254/
Once logged in you should see

Click on Advanced, Configuration, Ethernet.
This is where you can change the modems Ip address, the default is 192.168.1.254. I have changed this modem to 192.168.2.254.
Once you do change this, Internet explorer may ask you to log back in. Don't forget to press apply.

Next click on Advanced, then Firewall, Packet Filter.
Enter the rule name example Avtech, in the destination Ip key in your ip address mine is 192.168.2.0 and destination netmask of 255.255.255.0
In Type enter Tcp or Udp depending on what the device calls for. In below example Avtech uses TCP.
In the Destination port key in the port number you want to use, in this example I have used port 3003 - 3003.
See other examples below.

This allow you to connect say from an external pc or phone and get through the firewall.
Now we need to direct the traffic to the device or pc.
Click on Configuration, Virtual Server, Port Forwarding
Enter The application name: say Avtech, Protocol choose TCP, external port 3003-3003 and redirect port 3003-3003
This will now let you connect directly to the device. You have now configured port forwarding.

Monday, February 27, 2012
Runtime Error Mobile Me
You receive this message when you reboot your PC


Uninstall mobile me
Reboot
Re-install mobile me : http://support.apple.com/kb/DL769
Sierra Wireless HSPA Modem Internet Sharing
The customer in this Blog wanted to connect his Ipod through his Telstra wireless modem.
Internet sharing and networking can be frustrating, here is how I did it.
This was done with a Sierra wireless modem
Go to Start then in the search type : Adhoc , press enter on set up an ad hoc (computer to compuer ) network, Click next.
In the Network name type say : "Gregs Laptop"
Security type, I used WEP, security key was a 13 alphanumeric password.
Click next, it should display Gregs Laptop wireless network is ready to use, click close
In the taskbar at the bottom right of the screen near your volume control, click on network connections

Now you should see Gregs Laptop, it should say waiting for users.
Grab your iPhone Ipod etc, go to settings, then wifi, under choose a network click on Gregs Laptop wireless.
Re-enter that 13 alphanumeric password.
It should say Gregs Laptop connected.
Now at the bottom of the network connections you should see open network and sharing center, click on it.

Click on change adapter setting
In the list on connections you will find your Sierra Wireless HSPA network adapter, right click on this the properties.
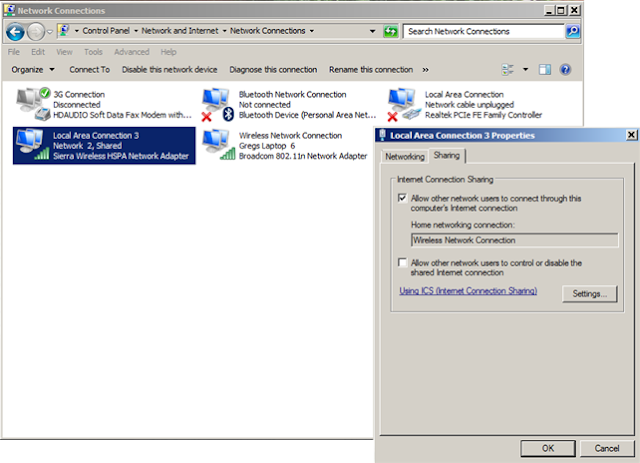
On the Sharing tab tick the box labelled "All other network users to connect through this computers Internet connection", below that there is a drop down box choose Wireless Network Connection, click ok.
Open network and sharing center again and while you are connecting to your new wireless connection,
Gregs Laptop wireless should come up as well as your standard network connection.

Look to the right hand side and confirm that the access type says Internet.
Should be all be good to go.
Hope this works for you.
Internet sharing and networking can be frustrating, here is how I did it.
This was done with a Sierra wireless modem
Go to Start then in the search type : Adhoc , press enter on set up an ad hoc (computer to compuer ) network, Click next.
In the Network name type say : "Gregs Laptop"
Security type, I used WEP, security key was a 13 alphanumeric password.
Click next, it should display Gregs Laptop wireless network is ready to use, click close
In the taskbar at the bottom right of the screen near your volume control, click on network connections

Now you should see Gregs Laptop, it should say waiting for users.
Grab your iPhone Ipod etc, go to settings, then wifi, under choose a network click on Gregs Laptop wireless.
Re-enter that 13 alphanumeric password.
It should say Gregs Laptop connected.
Now at the bottom of the network connections you should see open network and sharing center, click on it.
Click on change adapter setting
In the list on connections you will find your Sierra Wireless HSPA network adapter, right click on this the properties.

On the Sharing tab tick the box labelled "All other network users to connect through this computers Internet connection", below that there is a drop down box choose Wireless Network Connection, click ok.
Open network and sharing center again and while you are connecting to your new wireless connection,
Gregs Laptop wireless should come up as well as your standard network connection.

Look to the right hand side and confirm that the access type says Internet.
Should be all be good to go.
Hope this works for you.
Friday, February 24, 2012
Iprimus Smtp Not Working
Had a customer that could receive emails fine but sending emails would not work.
He is using Windows Mail
His Iprimus account details were correct
Iprimus website confirms details as follows
POP3 : pop.iprimus.com.au
SMTP: smtp.iprimus.com.au
I could not get this to work no matter what
I changed the SMTP setting to say
POP3 : pop.iprimus.com.au
SMTP: mail.bigpond.com
All works fine now
His email was an old email account which he kept but the SMTP would only work if changed to his current ISP which is Bigpond.
Wednesday, January 4, 2012
Tpg Peak And Off Peak Times
Depending on the plan you have : Your Peak and Off Peak times will vary.
First log into your account http://www.tpg.com.au click on Check Your Account Usage.
On the right hand side you should see Package type : mine is Naked 200g VoIP

To the right you will see the number two after the 200GB (Done in blue for this example)

Now scroll to the bottom of the page to no 2 (marked in yellow for this example)
My times are Peak 8.30am to 3.30am and Off Peak 3.30 am to 8.30am
To keep track of your Usage see my blog : http://lozaelec.blogspot.com/2010/07/tpg-usage-meter.html
On the right hand side you should see Package type : mine is Naked 200g VoIP


My times are Peak 8.30am to 3.30am and Off Peak 3.30 am to 8.30am
To keep track of your Usage see my blog : http://lozaelec.blogspot.com/2010/07/tpg-usage-meter.html
Saturday, December 17, 2011
Whitelist Url To IP
Billion 7404vnpx
Log into you modem : Go to: Configuration, Intrusion Detection, Then Whitelist
In the name type say : Facebook to get the Ip address go to : http://freelabs.info/urltoiponline.aspx
Type facebook.com in the right hand box
It will give you the Ip address to enter into the modem.


Log into you modem : Go to: Configuration, Intrusion Detection, Then Whitelist
In the name type say : Facebook to get the Ip address go to : http://freelabs.info/urltoiponline.aspx
Type facebook.com in the right hand box
It will give you the Ip address to enter into the modem.


Saturday, December 10, 2011
Apple Software Update
You install Apple updates but get "errors occurred while installing the updates" (see pictures below)
You can either go do the download folder and do it manually or fix. (Its annoying)
1) Go to : https://docs.google.com/leaf?id=0BwjqRgkVKt1INzdmNzE0OTYtNzU5NC00OWU3LTg2MzUtMmZkYTg2OTE0NzI1&hl=en&authkey=CK6Fq8AO
2) Double click on the downloaded file should be : GrantAdminFullControl_1.reg, click yes to user account control, then yes to registry editor.
3) Now when you right click on a file you will have Grant admin full control in the context menu.
4)Make your way to the update download directory C:\Users\yourusername\AppData\Local\Apple right click on Apple Software Update folder then Grant Admin Full Control, say yes to user control.5
5)Go to start, in the search program and files, key in apple software update, click on it when found.
It should check for update and install them.
After the installation I tried apple software updates again, it still had not done safari
I had to Grant Admin Full Control to the folder again after that all updates were done.


Friday, December 9, 2011
Itunes Getlasterror 5
You opened Itunes and the Apple software updates started.
You got this error itunes getlasterror 5
Sick of those updates that don't work, then you have to download them manually, then install as administrator even though you are the administrator.
Do This At Your Own Risk
Download "Grant full control" to right click context.
1) Go to : https://docs.google.com/leaf?id=0BwjqRgkVKt1INzdmNzE0OTYtNzU5NC00OWU3LTg2MzUtMmZkYTg2OTE0NzI1&hl=en&authkey=CK6Fq8AO
2) Double click on the downloaded file should be : GrantAdminFullControl_1.reg, click yes to user account control, then yes to registry editor.
2) Now when you right click on a file you will have Grant admin full control in the context menu.
3) Now make your way to : C:\ProgramData\Apple Computer
Right click on "Installer cashe" folder and click on Grant admin full control click yes to user account control.
I have also noticed that there is a folder called : C:\ProgramData\Apple which also has an Installer cashe folder. I think this was an old folder. ( You may need to grant control to this folder if it doesn't work)
If you have trouble with QuickTime still, uninstall QuickTime, then update it again, it should be fine from now on.
Hope this helps someone, worked for me.
Thursday, December 8, 2011
Billion Modem Intrusion Detection
I have a billion 7404vnpx firmware 7404VNPX_6.24b.afw
Going to certain website will lockup the modem due to third party content on the page
I found that I would have to reset the modem often or reset the Intrusion Detection in Configuration Firewall
It can be annoying when my partner screams "out the modem not working again, can you fix".
Since the introduction of the whitelist I have been able to minimize the number of times I need to reboot the modem.
http://lozaelec.blogspot.com.au/2011/12/whitelist-url-to-ip.html
Other related pages : http://forums.whirlpool.net.au/archive/1622370
Thursday, June 9, 2011
Nanostation 2.4 Ghz Setup
To connect this to your network you will need to know what you Ip address is for your home computer.
Eg my Ip address is on 192.168.2.10
My modem is at 192.168.2.254
The Nanostations Ip address by default is 192.168.1.20
So I needed to get my PC to 192.168.1.10 instead of 192.168.2.10
My network is configures with a static ip
How to change the network settings
In XP right click on My Network Places, then Properties, right click on local area network, then Properties, double click on Internet Protocol (TCP/IP).Now gow to (1)
In windows 7 click on windows explorer
Right click on Network, then Properties, click on change adapter settings, right click on local area network, then Properties, double click on Internet Protocol Version 4 (TCP/IPv4).
(1) If "use the following Ip address" is filled in please write down these settings you will need to place these settings back in later.
Click on Use the following Ip address and enter 192.168.1.10
subnet of 255.255.255.0 & gateway 192.168.1.254
With the DNS server click on Use the following DNS server addresses, In the preferred DNS server type 192.168.1.254
Once done, open up the web browser and type into the url section http://192.168.1.20/
When a login window appears type in ubnt for the username and password.
Click on the network tab, in the IP Address: type 192.168.2.20 or whatever ip address you want to give the Wireless access point. (make sure its an ip address far away from other computers)
Netmask: 255.255.255.0 - Gateway IP & Primary DNS IP: 192.168.2.254 or whatever you gate Ip address is.
Press change at the bottom
Now that its all configured, Internet explorer will probably disappear and to log back in you will need to use your new wireless ip address of 192.168.2.20 in the URL section, but before you do this you will need to
configure your computer back to 192.168.2.10
In windows 7 click on windows explorer
Right click on Network, then Properties, click on change adapter settings, right click on local area network, then Properties, double click on Internet Protocol Version 4 (TCP/IPv4).
Click on Use the following Ip address and enter the settings you wrote down earlier.
Mine was IP = 192.168.2.10 - Subnet = 255.255.255.0 & Gateway = 192.168.2.254 & DNS = 192.168.2.254
To check if you have configured everything correctly in Internet explorer url, type 192.168.2.20
you should see the login box if so enter ubnt and ubnt password.
Change all the settings wep key etc.
Now grab a device and try it.
The wireless device will pickup the wireless network and the Nanostion will route it straight to your gateway (your modem) all done.
Picures Below Of My Setup


Sunday, April 10, 2011
Telstra Pre-Paid Mobile Broadband Usb - Telstra Turbo Modem MF626i
I had a customer with a problem with a Telstra Pre-Paid Broadband usb modem working on her windows 7 machine. After a few hours I could not get this to work. I downloaded a zte driver for the device after working out that the model I had was a 626i. The drivers installed fine, but it would still not detect the autorun on the device to initiate the installation of the connection manager. In the device manager under other devices, I had 4 x usb ZTE devices found but would not install as a usb device. The telstra Pre-Paid Broadband usb did pickup as a drive now after the zte drivers were manually installed. Drivers were found : http://www.zte.com.au/telstra/Product_Downloads/MF626_downloads.htm
The connection manager from here didn't install.
The Mother board has 6 usb's at the rear and two on the front, but none worked for this device but all worked with usb sticks. Next I got the motherboard disk and re-installed the motherboard drivers, rebooted but still nothing. Under the device manager the universal serial bus control had the appropriate advanced host controllers installed, so I knew everything should work. Next was to find connection manager. I downloaded a couple of connection managers but still no luck. Rang Telstra help, but the person on the phone could not understand why when we plugged it in, it didn't install automatically.
I eventually used a Xp laptop which worked fine, at least she had Internet for now, but this was not her laptop. Went home. The next day I downloaded : http://www.telstra.com.au/bigpond-internet/download/document/bigpond-connection-manager-windows.zip
When extracted you will find this folder : Tucmw32-3.0.514, run setup.exe
But still no go, I decided to uninstall the Zte drivers, then installed the connection manager again, hit repair then reinstalled the ZTE drivers and wham it worked. How or why I do not know, just happy it was all going.
Gigabyte motherboard model : GA-EP43T-UD3L
Friday, February 25, 2011
Your Isp Has Asked You To Do A Ping Test
In windows 7 - (search programes and files) : Key in "cmd"
In Xp Go to Start then Run
A Dos box will apear, type in "ping google.com"
This will send and receive 4 packets, take note of the average speed in ms (milleseconds) nad the amount of lost packets.
If you want to do longer test use "ping google.com /n 50"
This will send & receive 50 packets
In some cases If you are having major internet dropouts you may be asked to do 1000 packet test, this may take some time. Use - "ping google.com /n 1000"
Tuesday, February 22, 2011
Friday, January 14, 2011
Modem Intermittantly Drops Out - Try Pinglotter To Help Solve Your Problem
Pinglotter Standard or Pro
The standard one I believe to be freeware Version1 and the Pro tool is free to try for 30 days.
If you are having problems understanding the ping results you can email them by pressing Help then Email Pinplotter Support. It takes a snapshot of you ping as soon as you hit the email button and sends it to them.
They have a very prompt support service.
Thursday, January 6, 2011
windows/system32/config/system file is missing
After using combofix to remove those hidden stubborn viruses you get the message windows/system32/config/system file is missing.
Please note that if you have got to this, most likely you have some bad viruses.
First take out the drive place it into another pc virus check it first then back up all your files.
Even though you may get your pc going again you will probably need to re-install XP.
Try this at your own risk, it worked for me
You will need to boot the system into the recovery console
1. Place the Windows XP cd into drive
2. Turn the computer off
3. Setup the computer to boot from cd by pressing F2 or F9 or Delete to get into the bios.
Dell computers use F12.
4. You will get a message to "Press any key to boot from the cd" Press enter.
5. Windows setup will initialize
6. You will see a " Welcome to Setup screen" press R to repair windows using recovery console.
7. Setup examines your hard drive.
8. You will be prompted to choose a Windows installation. Press 1 on the top of the keyboard and then
9. If you are asked to enter the Administrator password then enter now. Press Enter if you have no password.
10. From the dos promp enter
chkdsk /p (gap between k and /)
fixboot
11. Type exit this will reboot the pc.
12. Press F8 to enter safe mode, scroll down to the option "Advanced Options Menu".
13. Choose the Last Known Good Configuration.
14. If this did not boot into xp return to Windows recovery console.
15. From Dos prompt
cd \
cd system~1
If you get error message access denied, follow instructions below otherwise go to 19.
cd windows
cd system32
cd config
ren system system.bak
16. Type exit this will restart the computer.
17. Return to covery console
18. From Dos prompt enter
cd \
cd system~1
19. Type
cd _resto~1
20. If you get an error that there is no restore points follow steps below
cd \
cd windows
cd system32
cd config
copy c:\windows\repair\system system
21. If you are get a message "file not found error"
copy c:\windows\repair\system.bak system
copy c:\windows\repair\security security
copy c:\windows\repair\software software
copy c:\windows\repair\sam sam
copy c:\windows\repair\default default
exit
22. Reboot, all should work
Subscribe to:
Posts (Atom)