http://www.fixmytivo.com/tivo-repair.php
https://www.weaknees.com/tivo-kickstart-codes.php
Tivo guide : http://support.cableone.net/app/answers/detail/a_id/1096/related/1
Tivo - ports to open : http://support.mytivo.com.au/index.php?action=artikel&cat=40&id=76

Showing posts with label Product Support. Show all posts
Showing posts with label Product Support. Show all posts
Tuesday, August 21, 2012
Wednesday, April 18, 2012
Tivo Guide Will Not Update
Ports to open in your modem : Outbound ports to open
TCP port 80 - was already open
TCP port 443 - was already open
TCP port 5223
TCP port 7287
TCP port 7288
TCP port 8078
TCP port 8079
TCP port 8081
TCP port 8181
Here is an example of mine - Click for Larger View

More Details = http://support.tivo.com/app/answers/detail/a_id/402
TCP port 80 - was already open
TCP port 443 - was already open
TCP port 5223
TCP port 7287
TCP port 7288
TCP port 8078
TCP port 8079
TCP port 8081
TCP port 8181
Here is an example of mine - Click for Larger View

More Details = http://support.tivo.com/app/answers/detail/a_id/402
Friday, April 6, 2012
Foscam Wireless Ip Camera On Your Iphone
I purchased a Foscam FI8918W Wireless Ip camera.
http://foscam.us/foscam-fi8918w-wireless-ip-camera-11.html
Cost on eBay around $90.00
Very easy to setup
Plug in into your network to start with.
Using your browser log into foscam default is usually : http://192.168.1.254/
Once logged in, click on "For Administrator" (bottom left)
Here are the settings you will see

Scroll down to Basic Network Settings
Enter your own network settings if needed
Here is a copy of mine

Scroll down to Wireless LAN Settings
Enter your wireless settings then press submit
Scroll to User Settings
Enter a new user or just enter an admin users password
(Be AWARE - PLEASE ONLY USE A SHORT PASSWORD 4 DIGITS IN MY CASE - THE UNIT WILL LOCKUP IF YOU USE A LONG ONE SAY 13 ALPHANUMERIC LIKE I DID)
If it does lockup just reset the unit by press and hold for 10 seconds or so the reset button under the unit.
This will place this on the default ip address by the way
Now For the fun part
Go to app store and search for Foscam Sureil... or Surveillance Pro.
Once installed click on it, go to manage press the plus in the top right, scroll down to FI8918(w/e) reversed.
Camera name label : Home Local
Camera server http://(whatever/ ip you chose earlier on my eg: http://192.168.1.240/
Port : enter the port number you have used my eg: 5005
Enter the user name and password you entered earlier.
Press save at the top right
Now if you want to control this from externally, you will need to follow the steps above from Camera name label and this time enter : Home External
Camera server will be your wan Ip - see : http://lozaelec.blogspot.com.au/2011/07/what-is-my-wan-ip-address.html if unsure.
Once you have set up the second entry you are done.
You need to set up port forwarding in your modem, see : http://lozaelec.blogspot.com.au/2012/04/port-forwarding-billion-7404vnpx.html
On the IPhone app (Foscam Sureillance), click on manage, there will be two entries, click on the local one when your wifi is on and click on external when on 3g.
Wednesday, April 4, 2012
Port Forwarding Billion 7404vnpx
There are many modems and each have there own way to port forward.
In this example I will be using a billion 7404vnpx
Devices connected to the network : Avtech 16channel Dvr, Slingplayer, Logitech Sphere webcam, Foscam Ip camera, Tivo, Media Centre pc and many more.
Some software that I have port forwarded : Steam to me, Rdp, and Ness alarm ElkRP2, Mcontrol.
By default the Ip address for the Vnpx is 192.168.1.254
Using you browser type http://192.168.1.254/
Once logged in you should see

Click on Advanced, Configuration, Ethernet.
This is where you can change the modems Ip address, the default is 192.168.1.254. I have changed this modem to 192.168.2.254.
Once you do change this, Internet explorer may ask you to log back in. Don't forget to press apply.

Next click on Advanced, then Firewall, Packet Filter.
Enter the rule name example Avtech, in the destination Ip key in your ip address mine is 192.168.2.0 and destination netmask of 255.255.255.0
In Type enter Tcp or Udp depending on what the device calls for. In below example Avtech uses TCP.
In the Destination port key in the port number you want to use, in this example I have used port 3003 - 3003.
See other examples below.

This allow you to connect say from an external pc or phone and get through the firewall.
Now we need to direct the traffic to the device or pc.
Click on Configuration, Virtual Server, Port Forwarding
Enter The application name: say Avtech, Protocol choose TCP, external port 3003-3003 and redirect port 3003-3003
This will now let you connect directly to the device. You have now configured port forwarding.

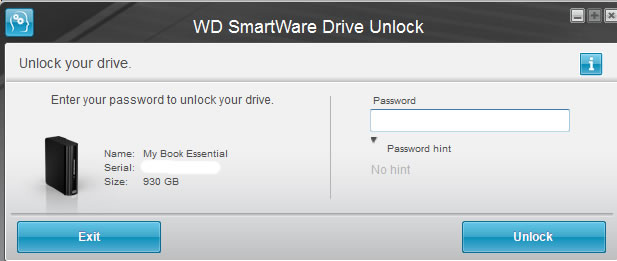
My Book Essential Wd SmartWare Drive
You have Plugged in your My Book Essential Wd SmartWare Drive but you cant see files or folders.
This means you have locked the drive with a password
This is to help you protect your files when connected to a PC that hasn't had the drive connected to it before
Run unlock
Enter password
All your files will be visible

This means you have locked the drive with a password
This is to help you protect your files when connected to a PC that hasn't had the drive connected to it before
Run unlock
Enter password
All your files will be visible
Thursday, December 8, 2011
Billion Modem Intrusion Detection
I have a billion 7404vnpx firmware 7404VNPX_6.24b.afw
Going to certain website will lockup the modem due to third party content on the page
I found that I would have to reset the modem often or reset the Intrusion Detection in Configuration Firewall
It can be annoying when my partner screams "out the modem not working again, can you fix".
Since the introduction of the whitelist I have been able to minimize the number of times I need to reboot the modem.
http://lozaelec.blogspot.com.au/2011/12/whitelist-url-to-ip.html
Other related pages : http://forums.whirlpool.net.au/archive/1622370
Thursday, June 9, 2011
Nanostation 2.4 Ghz Setup
To connect this to your network you will need to know what you Ip address is for your home computer.
Eg my Ip address is on 192.168.2.10
My modem is at 192.168.2.254
The Nanostations Ip address by default is 192.168.1.20
So I needed to get my PC to 192.168.1.10 instead of 192.168.2.10
My network is configures with a static ip
How to change the network settings
In XP right click on My Network Places, then Properties, right click on local area network, then Properties, double click on Internet Protocol (TCP/IP).Now gow to (1)
In windows 7 click on windows explorer
Right click on Network, then Properties, click on change adapter settings, right click on local area network, then Properties, double click on Internet Protocol Version 4 (TCP/IPv4).
(1) If "use the following Ip address" is filled in please write down these settings you will need to place these settings back in later.
Click on Use the following Ip address and enter 192.168.1.10
subnet of 255.255.255.0 & gateway 192.168.1.254
With the DNS server click on Use the following DNS server addresses, In the preferred DNS server type 192.168.1.254
Once done, open up the web browser and type into the url section http://192.168.1.20/
When a login window appears type in ubnt for the username and password.
Click on the network tab, in the IP Address: type 192.168.2.20 or whatever ip address you want to give the Wireless access point. (make sure its an ip address far away from other computers)
Netmask: 255.255.255.0 - Gateway IP & Primary DNS IP: 192.168.2.254 or whatever you gate Ip address is.
Press change at the bottom
Now that its all configured, Internet explorer will probably disappear and to log back in you will need to use your new wireless ip address of 192.168.2.20 in the URL section, but before you do this you will need to
configure your computer back to 192.168.2.10
In windows 7 click on windows explorer
Right click on Network, then Properties, click on change adapter settings, right click on local area network, then Properties, double click on Internet Protocol Version 4 (TCP/IPv4).
Click on Use the following Ip address and enter the settings you wrote down earlier.
Mine was IP = 192.168.2.10 - Subnet = 255.255.255.0 & Gateway = 192.168.2.254 & DNS = 192.168.2.254
To check if you have configured everything correctly in Internet explorer url, type 192.168.2.20
you should see the login box if so enter ubnt and ubnt password.
Change all the settings wep key etc.
Now grab a device and try it.
The wireless device will pickup the wireless network and the Nanostion will route it straight to your gateway (your modem) all done.
Picures Below Of My Setup


Monday, April 11, 2011
Can't Login To My Tivo Account
Spent hours searching for your password.
You pressed the forgot your password, but it wouldn't accept your email address.
Its driving you nuts right.
Could be that you have logged into the ".com" instead of the ".com.au"
You would think they would link the two or at least tell you that that email addres is for another country.
You pressed the forgot your password, but it wouldn't accept your email address.
Its driving you nuts right.
Could be that you have logged into the ".com" instead of the ".com.au"
You would think they would link the two or at least tell you that that email addres is for another country.
Subscribe to:
Posts (Atom)